Saturday, February 24, 2018

Microservices with Oracle ADF Remote Regions

ADF remote regions - functionality available in the latest ADF 12c versions. ADF remote region runs on different server and content is delivered to consuming module through ADF remote region servlet. This allows to decouple large enterprise system into separate modules, each running independently on separate servers. Gained advantage - system becomes more scalable and reliable, even if several modules will be down, system will continue to be functional.

Concept of ADF remote regions, reminds me closely microservices architecture. Microservices - also known as the microservice architecture - is an architectural style that structures an application as a collection of loosely coupled services, which implement business capabilities. The microservice architecture enables the continuous delivery/deployment of large, complex applications. It also enables an organization to evolve its technology stack (as describe here).

Let's see how ADF remote regions are configured and consumed. Sample application (available for download from GitHub repository) is based on Employees and Jobs modules. Each module is deployed on different servers, Employees module is consumed in Jobs. Microservice here - Employees table. This table comes from loosely coupled service and is consumed within Jobs module:


Employees module runs on ADF server in Docker container (read more: Essential WebLogic Tuning to Run on Docker and Avoid OOM):


I will stop this module:


Jobs module still works, even Employees module is not available anymore - it is stopped. Otherwise if both modules would be deployed as single application - if application is down, system will be completely unavailable. But now users can access part of the functionality:


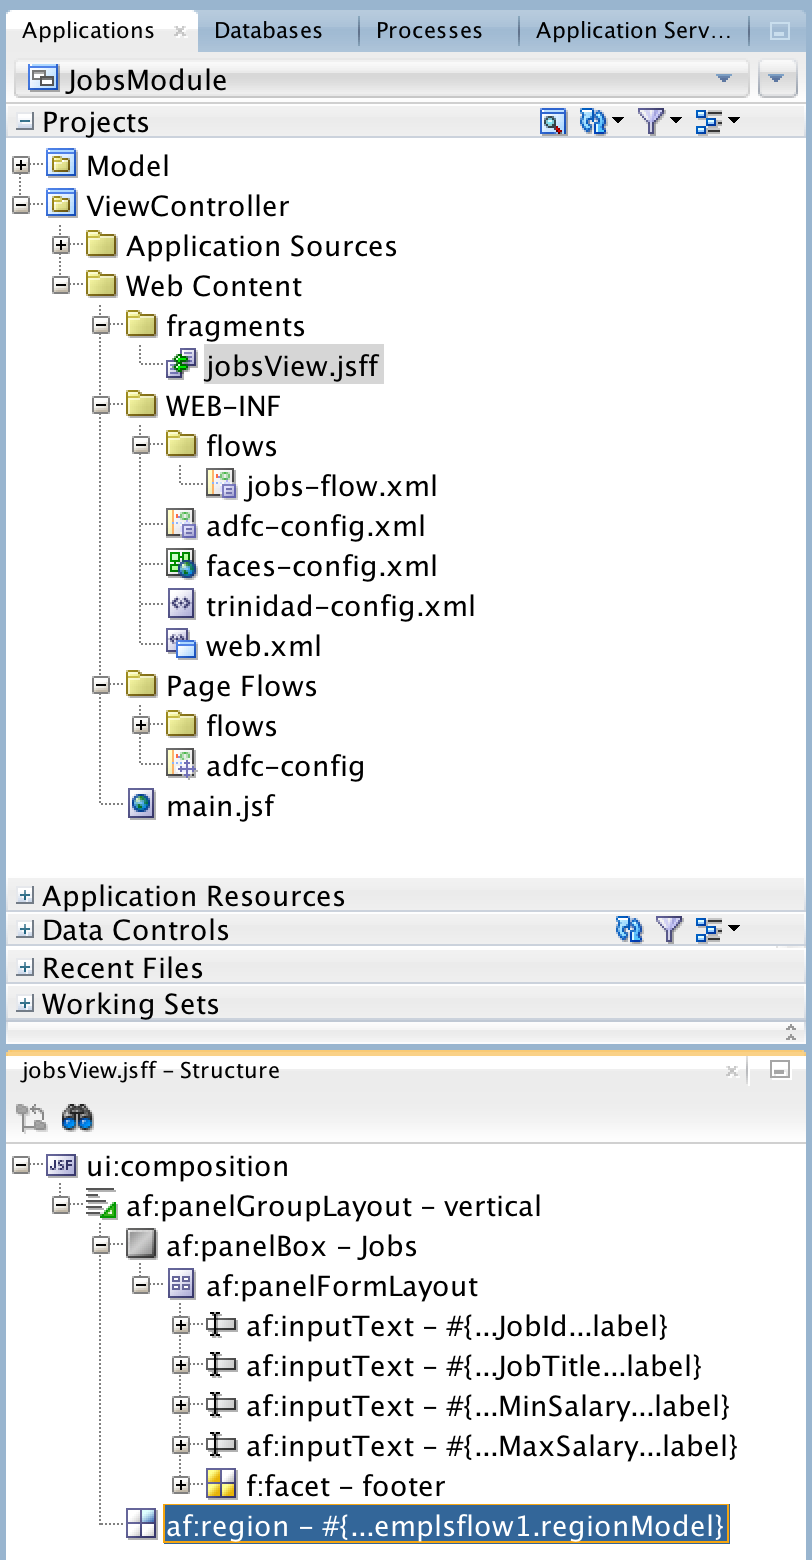
Will dive into technical part. ADF remote region is not different from the way how regular ADF region is consumed. You still must use ADF region tag, to define region:


Key difference is in region bindings - there is one extra property called Remote Connection. This connection defines source, from where remote region content is transferred. All other properties are the same, we can pass parameters too:


Consuming module must define ADF remote region connection. If connection details are correct, you should see ADF task flows with remote access listed:


Remote region connection wizard. You should use module context root and point to ADF remote region servlets rtfquery and rr:


This wizard can be opened by right clicking on Connections folder and going to New Connections section:


Consumer module should be enabled with remote region consumer support:


Producer module should be enabled with remote region producer support:


Producer module is configured with required servlets automatically, as soon as you enable remote region producer support:


Read more about ADF remote regions in ADF developer guide - 26.13 Creating Remote Regions in a Fusion Web Application.

Saturday, February 17, 2018

Shredding and Querying with Oracle Offline Persistence in JET

I think offline functionality topic should become a trend in the future. Its great that Oracle already provides solution for offline - Oracle Offline Persistence toolkit. This is my second post related to offline support, read previous post - Oracle Offline Persistence Toolkit - Simple GET Response Example with JET. I have tested and explained with sample app how it works to handle simple GET response offline. While today I would like to go one step further and check how to filter offline data - shredding and querying offline.

Sample app is fetching a list of employees - Get Employees button. It shows online/offline status - see icon in top right corner. We are online and GET response was cached by persistence toolkit:


We can test offline behaviour easily - this can be done through Chrome Developer Tools - turn on Offline mode. Btw, take a look into Initiator field for GET request - it comes from Oracle Offline Persistence toolkit. As I mention it in my previous post - once persistence toolkit is enabled, all REST calls are going through toolkit, this is how it is able to cache response data:


While offline, click on Get Employees button - you should see data returned from cache. Did you noticed - icon in the top right corner was changed to indicate we are offline:


Ok, now we will see how shredding mechanism works (more about it read on GitHub). While offline, we can search for subset of cached data. Search By Name does that, it gets from cache entry for Lex:


Switch online and call same action again, but with different name - REST call will be invoked against back-end server as expected. Again it is transparent to JET developer, no need to worry if app state is online/offline, same REST request is done in both cases:


Let's take a quick look into implementation part (complete example is available on my GitHub repository).

Online/offline status icon is controlled by observable variable:


It is very simple to determine online/offline state. We need to add event listener for online/offline and reset observable variable accordingly:


Persistence toolkit supports Simple and Oracle shredder/query handlers. I'm using ADF BC REST for backend and so my choice is oracleRestJsonShredding and oracleRestQueryHandler. Oracle shredder understands REST structure returned by ADF BC REST. Oracle query handler support filtering parameters for ADF BC REST for offline filtering - this allows to use same query format for both online and offline. I was happy to read that Oracle query handler explicitly supports ADF BC REST - queryHandlers:


Same REST call with filtering is executed online and offline:

Wednesday, February 7, 2018

Oracle JET Composite Components - Manual for JET Coder

JET Composite Components - are useful not only to build UI widgets, but also to group and simplify JET code. In this post, I will show how to wrap JET table into composite component and use all essential features, such as properties, methods, events and slots.

Sample app code is available on GitHub. JET table is wrapped into composite component, it comes with slot for toolbar buttons:


What is the benefit to wrap such components as JET table into your own composite? To name a few:

1. Code encapsulation. Complex functionality, which requires multiple lines of HTML and JS code resides in the composite component
2. Maintenance and migration. It is easier to fix JET specific changes in single place
3. Faster development. There is less steps to repeat and less code to write for developer, when using shorter definition of the wrapper composite component

Sample application implements table-redsam component, for the table UI you can see above. Here is component usage example, very short and clean:


All the properties specific to given table are initialised in the module. Developer should provide REST endpoint, key values, pagination size and column structure. The rest is happening in the composite component and is hidden from the developer, who wants to implement a table:


Properties

We should take a look into array type property. Such property allows to pass array into component. This can be useful either to pass array of data to be displayed or array of metadata to help with component rendering. In our case we pass array of metadata, which helps to render table columns. Array type property is based on two attributes - Header Text and Field. Properties are defined in composite component JSON file:


Properties are retrieved from variable inside component and are assigned to local variables:


This is table implementation inside component, columns are initialised from component property:


Slots

Slot defines a placeholder, where developer who is using composite component can add additional elements. Slot is defined in component JSON definition file:


To define slot, JET slot component should be defined inside composite. You can control layout and location where slot will be rendered:


In our case, we use slot for table toolbar buttons. These buttons are added later, when developer is using composite. To place button into slot, put button inside composite component tag and assign defined slot name for the button. This will allow to render button in the slot:


Methods

Method defined in composite component, can be called from outside. In example below, I call JS function from toolbar slot button:


Function gets composite by ID and calls exposed method:


Method should be defined in composite JSON definition:


Method is implemented inside composite JS module:


Events

Events allows to implement external listeners. Basically this allows to override composite logic in external functions. Event is declared in composite JSON definition:


Composite tag contains event property mapped with external JS function, which will be called when event happens inside composite:


Function code in the module, it prints current row selection key:


Table is defined with listener property inside composite:


Listener inside composite initiates event, which will be distributed outside and handled by method defined in composite tag on-handle-selection property:


Let's see how it works. Call Method button invokes method inside composite:


Table row selection first triggers listener inside composite, then it initiates event and external listener is invoked too:


I think this lists pretty much all of the essential functionality given by JET composite components. I hope you will find it useful in your development.

Sunday, February 4, 2018

Say Hello to Red Samurai Contextual Chatbot with TensorFlow Deep Neural Network Learning

We are building our own enterprise chatbot. This chatbot helps enterprise users to run various tasks - invoice processing, inventory review, insurance cases review, order process - it will be compatible with various customer applications. Chatbot is based on TensorFlow Machine learning for user input processing. Machine learning helps to identify user intent, our custom algorithm helps to set conversation context and return response. Context gives control over  sequence of conversations under one topic, allowing chatbot to keep meaningful discussion based on user questions/answers. UI part is implemented in two different versions - JET and ADF, to support integration with ADF and JET applications.

Below is the trace of conversations with chatbot:


User statement Ok, I would like to submit payment now sets context transaction. If word payment is entered in the context of transaction, payment processing response is returned. Otherwise if there is no context, word payment doesn't return any response. Greeting statement - resets context.

Intents are defined in JSON structure. List of intents is defined with patterns and tags. When user types text, TensorFlow Machine learning helps to identify pattern and it returns probabilities for matching tags. Tag with highest probability is selected, or if context was set - tag from context. Response for intent is returned randomly, based on provided list. Intent could be associated with context, this helps to group multiple related intents:


Contextual chatbot is implemented based on excellent tutorial - Contextual Chatbots with Tensorflow. Probably this is one of the best tutorials for chatbot based on TensorFlow. Our chatbot code follows closely ideas and code described there. You could run the same on your TensowFlow environment - code available on GitHub. You should run model first and then response Python notebooks.

Model notebook trains neural network to recognize intent patterns. We load JSON file with intents into TensorFlow:


List of intent patterns is prepared to be suitable to feed neural network. Patterns are translated into stemmed words:


Learning part is done with TensorFlow deep learning library - TFLearn. This library makes it more simple to use TensorFlow for machine learning by providing higher-level API. In particular for our chatbot we are using Deep Neural Network model - DNN:


Once training is complete and model is created, we can save it for future reuse. This allows to keep model outside of chatbot response processing logic and makes it easier to re-train model on new set of intents when required:


In response module, we load saved model back:


Function response acts as entry point to our chatbot. It gets user input and calls classify function. Classification function, based on learned model, returns list of suggested tags for identified intents. Algorithm locates intent by its tag and returns random reply from associated list of replies. If context based reply is returned, only if context was set previously:


Stay tuned for more blog posts on this topic.