Thursday, March 29, 2018

Socket.IO Integration with Oracle JET

Socket.IO is a JavaScript library for realtime web applications. It comes in two parts - a client-side library that runs in the browser and a server-side library for Node.js. In this post I will walk you through complete integration scenario with Oracle JET.

Here you can see it in action. Send Event button from JET - sends message through Socket.IO to Node.js server side. Message is handled on server side and response is sent back to client (displayed in browser console):


Server side part with Socket.io is implemented in Node.js application and it runs on Express. To create Node.js application (which is just one json file in the beginning), run command:

npm init

To add Express and Socket.io, run commands:

npm install express --save
npm install socket.io --save

To start Node.js application on Express, run command:

npm start

Double check package.json, it should contain references to Express and Socket.IO:


Here is server side code for Socket.IO (I created server.js file manually). When connection is established with the client, message is printed. Method socket.on listens for incoming messages. Method socket.emit transmits message to client. In both cases we can use JSON structure for payload variable. There is cheatsheet for socket.emit - Socket.IO - Emit cheatsheet. Socket.IO server side:


Socket.IO client side can be installed into JET application with NPM. There is separate section in Oracle JET documentation, where you can read step by step instructions about 3-rd party library installation into Oracle JET - Adding Third-Party Tools or Libraries to Your Oracle JET Application. I would recommend manually include Socket.IO dependency entry into package.json in JET:


Then run command to fetch Socket.IO library into JET application node modules. Next continue with instructions from Oracle JET guide and check my sample code:

npm update

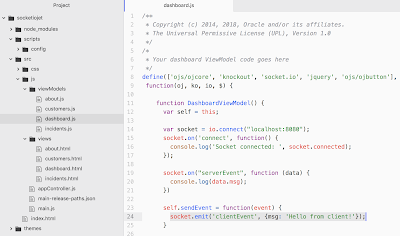
To establish socket connection - import Socket.IO into JET module and use io.connect to establish socket connection. Connect to the end point where Express is running with server side Socket.IO listener. Client side is using same socket.on and socket.emit API methods as server side:


Download sample code from my GitHub repository.

Wednesday, March 28, 2018

ADF on Docker - Java Memory Limit Tuning for JVM

It might look like a challenge to run Java in Docker environment, by default Java is not aware of Docker memory limits. Check this article for example - Java inside docker: What you must know to not FAIL.  I was able to run WebLogic and ADF (Essential WebLogic Tuning to Run on Docker and Avoid OOM) on Docker previously without Java memory issues, using JAVA_OPTIONS=-XX:+UnlockCommercialFeatures -XX:+ResourceManagement -XX:+UseG1GC. However after Docker upgrade to latest version, these settings didn't help anymore. I did't want to hardcode memory setting with -Xmx.

Java started to consume all available memory in Docker and eventually was killed. You can see this from chart below - memory is growing, killed and after restart growing again:


To solve this behaviour, I have applied settings from Java Platform Group, Product Management Blog - Java SE support for Docker CPU and memory limits. I have replaced JAVA_OPTIONS=-XX:+UnlockCommercialFeatures -XX:+ResourceManagement -XX:+UseG1GC set previously with JAVA_OPTIONS=-XX:+UnlockExperimentalVMOptions -XX:+UseCGroupMemoryLimitForHeap -XX:+UseG1GC.

JAVA_OPTIONS=-XX:+UnlockExperimentalVMOptions - XX:+UseCGroupMemoryLimitForHeap -XX:+UseG1GC did the job - JVM stays in Docker memory limits sharp:


This chart shows Java memory behaviour before and after settings were applied. From March 27th - Java memory is a straight line with JAVA_OPTIONS=-XX:+UnlockExperimentalVMOptions - XX:+UseCGroupMemoryLimitForHeap -XX:+UseG1GC:

Tuesday, March 27, 2018

Oracle JET Offline Persistence Toolkit - Offline Update Handling

Oracle JET Offline Persistence Toolkit supports offline update, create and delete operations. In this post I will describe update use case. Read previous post related to offline toolkit, where I explain how to handle REST pagination, querying and shredding - REST Paging Support by Oracle Offline Persistence in JET.

This gif shows scenario, where we go to offline mode and then changing data in multiple rows. Data update happens offline and each PATCH request is tracked by offline persistence toolkit:


As soon as we go online (Offline checkbox value is changed in Chrome Developer Tools) - requests executed while offline are replayed automatically against backend server:


We should see, how update flow is implemented in JET in this particular case. Once data is changed, we call submitUpdate function. This function in turn calls JET Model API function save. This triggers PATCH call to back-end to update data. If we are offline, JET offline persistence toolkit, transparently records PATCH request to be able to replay it later while online. There are no specific code changes needed by developer to support offline logic during REST call:


Once we go online, listener is invoked and it calls our function synchOfflineChanges. This function triggers request replay to the backend. This means we can control, when requests are replayed. Besides this, we can control each request which failed to be replayed - this is important, when data conflict happens during update in backend:


Online handler is registered with window.addEventListener in the same module, where persistence manager is defined:


Offline Persistence Toolkit 1.1.1 supports extensive logging. You can update to 1.1.1 version by running: npm install @oracle/offline-persistence-toolkit command:


To enable persistence toolkit logger, add persist/impl/logger module to your target module and call logger.option('level', logger.LEVEL_LOG):


Logger prints useful information about offline update, this helps to debug offline functionality:


Download sample application from GitHub repository.

Thursday, March 22, 2018

ADF Declarative Component Example

ADF Declarative Component support is popular ADF framework feature, but in this post I would like to explain it from slightly different angle. I will show how to pass ADF binding and Java bean objects into component through properties, in these cases when component must show data from ADF bindings, such approach could offer robustness and simplify component development.

This is component implemented in the sample app - choice list renders data from ADF LOV and button calls Java bean method to print selected LOV item value (retrieved from ADF bindings):


JDeveloper provides wizard to create initial structure for declarative component:


This is ADF declarative component, it is rendered from our own tag. There are two properties. List binding is assigned with LOV binding object instance and bean property with Java bean instance defined in backing bean scope. In this way, we pass objects directly into the component:


LOV binding is defined in target page definition file, where component is consumed:


Bean is defined in the same project, where page which consumes ADF declarative component is created. We need to define component property type to match bean type, for that reason, we must create class interface in the component library and in target project implement it:


Component and main projects can be in the same JDEV application, we can use JDEV working sets to navigate between projects (when running main project, we dont want to run component project, component project is deployed and reused through ADF JAR library):


Bean interface is defined inside component:


Property for list binding is defined with JUCtrlListBinding type, this allows to pass binding instance directly to the component. Same for bean instance, using interface to define bean instance type, which will be assigned from the page, where component is used:


Declarative component is based on combination of ADF Faces components:


Download sample application from GitHub repository.

Sunday, March 11, 2018

Find In Cache By Key ADF BC API Method Usage

What if you need to verify - if row with given key exists in fetched rowset? This could be useful while implementing validation logic. ADF BC API method findByKey - will trigger SQL call and fetch row from DB, if row with given key doesn't exist in fetched rowset. Luckily there is ADF BC API method called findInCacheByKey, this method only checks for row in fetched rowset, without going to DB - very convenient in certain situations, when you actually don't want to bring record from DB, if it wasn't fetched.

Imagine table with pagination feature. First ten rows are fetched and exist in the cache:


Now if we call custom method, where findInCacheByKey is invoked twice - you will see different results. First call is using key from fetched rowset - this call will find a row. Second call is using key, which doesn't belong to the fetched rowset - row is not in cache and call will return zero rows:


Download sample app from my GitHub repository.

Tuesday, March 6, 2018

REST Paging Support by Oracle Offline Persistence in JET

Oracle Offline Persistence query handler - Oracle Rest Query Handler supports pagination for Oracle ADF BC REST service out of the box. Check my previous post to see how querying works through offline persistence toolkit for ADF BC REST service - Shredding and Querying with Oracle Offline Persistence in JET.

Pagination is a must for large REST resources, its great that Oracle offline persistence toolkit supports it. Let's see it in action.

I navigate through the data with left/right arrows, this triggers REST call with pagination parameters - limit and offset. These are standard parameters supported by ADF BC REST. Requests are executed online:


All pages of data are cached by offline toolkit, if while offline we try to access previously cached page by executing REST request with paging parameters - we will get data from offline toolkit. Now I switch offline and try to navigate to the one of cached pages - data is retrieved from cache automatically:


If I navigate to the page, which was not cached (meaning - not accessed while online) - no results returned. In such situation I can navigate back (paging parameters will be updated) and cached data will be displayed for the page which was cached:


Paging navigation control buttons are calling JS functions to update startIndex:


Sample application is using JET Collection API to execute fetch requests. Collection is extended with getURL function which sets limit and offset parameters to execute paging request:


Once again, make sure to use Oracle Rest Query Handler in offline persistence toolkit configuration:


Fetch function is called through JET Collection API. Start index value is calculated dynamically - this allows to execute paging requests. Same function works online and offline, no need to worry about connection status, all online/offline logic is handled by persistence toolkit:


Sample application for this post is available on GitHub.

Saturday, March 3, 2018

Classification - Machine Learning Chatbot with TensorFlow

Visual conversation flow is a first thing to create, when you want to build chatbot. Such flow will help to define proper set of intents along with dialog path. Otherwise it is very easy to get lost in conversation transitions and this will lead to chatbot implementation failure. Our chatbot for medical system doesn't make any decisions, instead it helps user to work with enterprise system. It gets user input and during conversation leads to certain API call - which at the end triggers enterprise system to execute one or another action. If user is looking for patient blood pressure results, chatbot will open blood pressure module with patient ID. If user wants to edit or review blood pressure results in general, chatbot will load blood pressure results module without parameters. This kind of chatbot is very helpful in large and complex enterprise systems, this helps to onboard new users much quicker without extra training for system usage. Example of visual conversation flow for chatbot:


Conversation intents can be logged in JSON file. Where you should list conversation patterns mapped with tags, responses and contextual information. Chatbot is not only about machine learning and user input processing, very important is to handle conversation contextual flow and usually this is done outside of machine learning area in another module. We will look into it later. Machine learning with neural network is responsible to allow chatbot to calculate tag probability based on user input. In other words - machine learning helps to bring the best matching tag for current sentence, based on predefined intents patterns. As long as we get probability for the intent tag - we know what user wants, we can set conversation context and in the next user request - react based on current context:


TensorFlow runs neural network, which trains on supplied list of intents. Each training run may produce different learning results, you should check total loss value - lower value, better learning result. Probably you will run training multiple times to get optimal learning model:


TensorFlow can save learned model to be reusable by classification API. REST interface which calls classification API is developed as separate TensorFlow module. REST is handled by Flask library installed into TensorFlow runtime:


Classification function gets user input from REST call and runs it through TensorFlow model. Results with higher probability than defined by threshold are collected into ordered array and returned back. We have classification function without REST annotation for local tests within TensorFlow runtime:


Let's see how classification works, result of classification will drive next action for the chatbot. Each classification request returns matched tag and probability. User input is not identical to the patterns defined in intents, thats why matching probability may differ - this is core part of machine learning. Neural network constructed with TensorFlow, based on learned model, assumes the best tag for current user input.

User input "Checking blood pressure results for patient". This input can be related to both tags blood_pressure_search and blood_pressure, but classification decides higher probability for the first option, and this is correct. Similar for user input "Any recommendations for adverse drugs?":


Through REST endpoint we can call classification function outside of TensorFlow environment. This will allows us to maintain conversation context outside TensorFlow:


Useful resources:

- TensorFlow notebooks and intents JSON are available on GitHub repository.
- Excellent article about Contextual Chatbots with TensorFlow
- My previous post about Red Samurai chatbot