Wednesday, February 7, 2018

Oracle JET Composite Components - Manual for JET Coder

JET Composite Components - are useful not only to build UI widgets, but also to group and simplify JET code. In this post, I will show how to wrap JET table into composite component and use all essential features, such as properties, methods, events and slots.

Sample app code is available on GitHub. JET table is wrapped into composite component, it comes with slot for toolbar buttons:


What is the benefit to wrap such components as JET table into your own composite? To name a few:

1. Code encapsulation. Complex functionality, which requires multiple lines of HTML and JS code resides in the composite component
2. Maintenance and migration. It is easier to fix JET specific changes in single place
3. Faster development. There is less steps to repeat and less code to write for developer, when using shorter definition of the wrapper composite component

Sample application implements table-redsam component, for the table UI you can see above. Here is component usage example, very short and clean:


All the properties specific to given table are initialised in the module. Developer should provide REST endpoint, key values, pagination size and column structure. The rest is happening in the composite component and is hidden from the developer, who wants to implement a table:


Properties

We should take a look into array type property. Such property allows to pass array into component. This can be useful either to pass array of data to be displayed or array of metadata to help with component rendering. In our case we pass array of metadata, which helps to render table columns. Array type property is based on two attributes - Header Text and Field. Properties are defined in composite component JSON file:


Properties are retrieved from variable inside component and are assigned to local variables:


This is table implementation inside component, columns are initialised from component property:


Slots

Slot defines a placeholder, where developer who is using composite component can add additional elements. Slot is defined in component JSON definition file:


To define slot, JET slot component should be defined inside composite. You can control layout and location where slot will be rendered:


In our case, we use slot for table toolbar buttons. These buttons are added later, when developer is using composite. To place button into slot, put button inside composite component tag and assign defined slot name for the button. This will allow to render button in the slot:


Methods

Method defined in composite component, can be called from outside. In example below, I call JS function from toolbar slot button:


Function gets composite by ID and calls exposed method:
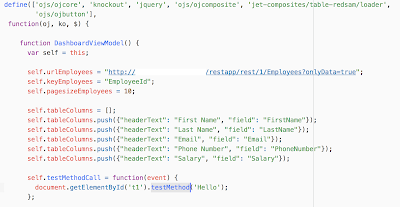

Method should be defined in composite JSON definition:


Method is implemented inside composite JS module:


Events

Events allows to implement external listeners. Basically this allows to override composite logic in external functions. Event is declared in composite JSON definition:


Composite tag contains event property mapped with external JS function, which will be called when event happens inside composite:


Function code in the module, it prints current row selection key:


Table is defined with listener property inside composite:


Listener inside composite initiates event, which will be distributed outside and handled by method defined in composite tag on-handle-selection property:


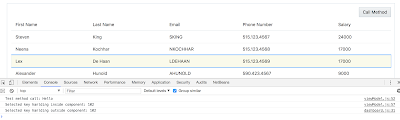
Let's see how it works. Call Method button invokes method inside composite:


Table row selection first triggers listener inside composite, then it initiates event and external listener is invoked too:

I think this lists pretty much all of the essential functionality given by JET composite components. I hope you will find it useful in your development.

Sunday, February 4, 2018

Say Hello to Red Samurai Contextual Chatbot with TensorFlow Deep Neural Network Learning

We are building our own enterprise chatbot. This chatbot helps enterprise users to run various tasks - invoice processing, inventory review, insurance cases review, order process - it will be compatible with various customer applications. Chatbot is based on TensorFlow Machine learning for user input processing. Machine learning helps to identify user intent, our custom algorithm helps to set conversation context and return response. Context gives control over  sequence of conversations under one topic, allowing chatbot to keep meaningful discussion based on user questions/answers. UI part is implemented in two different versions - JET and ADF, to support integration with ADF and JET applications.

Below is the trace of conversations with chatbot:


User statement Ok, I would like to submit payment now sets context transaction. If word payment is entered in the context of transaction, payment processing response is returned. Otherwise if there is no context, word payment doesn't return any response. Greeting statement - resets context.

Intents are defined in JSON structure. List of intents is defined with patterns and tags. When user types text, TensorFlow Machine learning helps to identify pattern and it returns probabilities for matching tags. Tag with highest probability is selected, or if context was set - tag from context. Response for intent is returned randomly, based on provided list. Intent could be associated with context, this helps to group multiple related intents:


Contextual chatbot is implemented based on excellent tutorial - Contextual Chatbots with Tensorflow. Probably this is one of the best tutorials for chatbot based on TensorFlow. Our chatbot code follows closely ideas and code described there. You could run the same on your TensowFlow environment - code available on GitHub. You should run model first and then response Python notebooks.

Model notebook trains neural network to recognize intent patterns. We load JSON file with intents into TensorFlow:


List of intent patterns is prepared to be suitable to feed neural network. Patterns are translated into stemmed words:


Learning part is done with TensorFlow deep learning library - TFLearn. This library makes it more simple to use TensorFlow for machine learning by providing higher-level API. In particular for our chatbot we are using Deep Neural Network model - DNN:


Once training is complete and model is created, we can save it for future reuse. This allows to keep model outside of chatbot response processing logic and makes it easier to re-train model on new set of intents when required:


In response module, we load saved model back:


Function response acts as entry point to our chatbot. It gets user input and calls classify function. Classification function, based on learned model, returns list of suggested tags for identified intents. Algorithm locates intent by its tag and returns random reply from associated list of replies. If context based reply is returned, only if context was set previously:


Stay tuned for more blog posts on this topic.

Monday, January 29, 2018

Avoid Blind SQL Call from ADF Task Flow Method

Keep an eye open on ADF Task Flow Method Call activities where methods from ADF Bindings are called. JDEV 12c sets deferred refresh for ADF binding iterators related to TF Method Call activities and this causing blind SQL to be executed. Blind SQL - query without bind variables.

Let me explain the use case, so that it will be more clear what I'm talking about.

Common example - TF initialization method call where data is prepared. Typically this involves VO execution with bind variables:


Such method call could invoke binding operation either directly (pay attention - bind variable value is set):


Or through Java bean method using API:


My example renders basic UI form in the fragment, after TF method call was invoked:


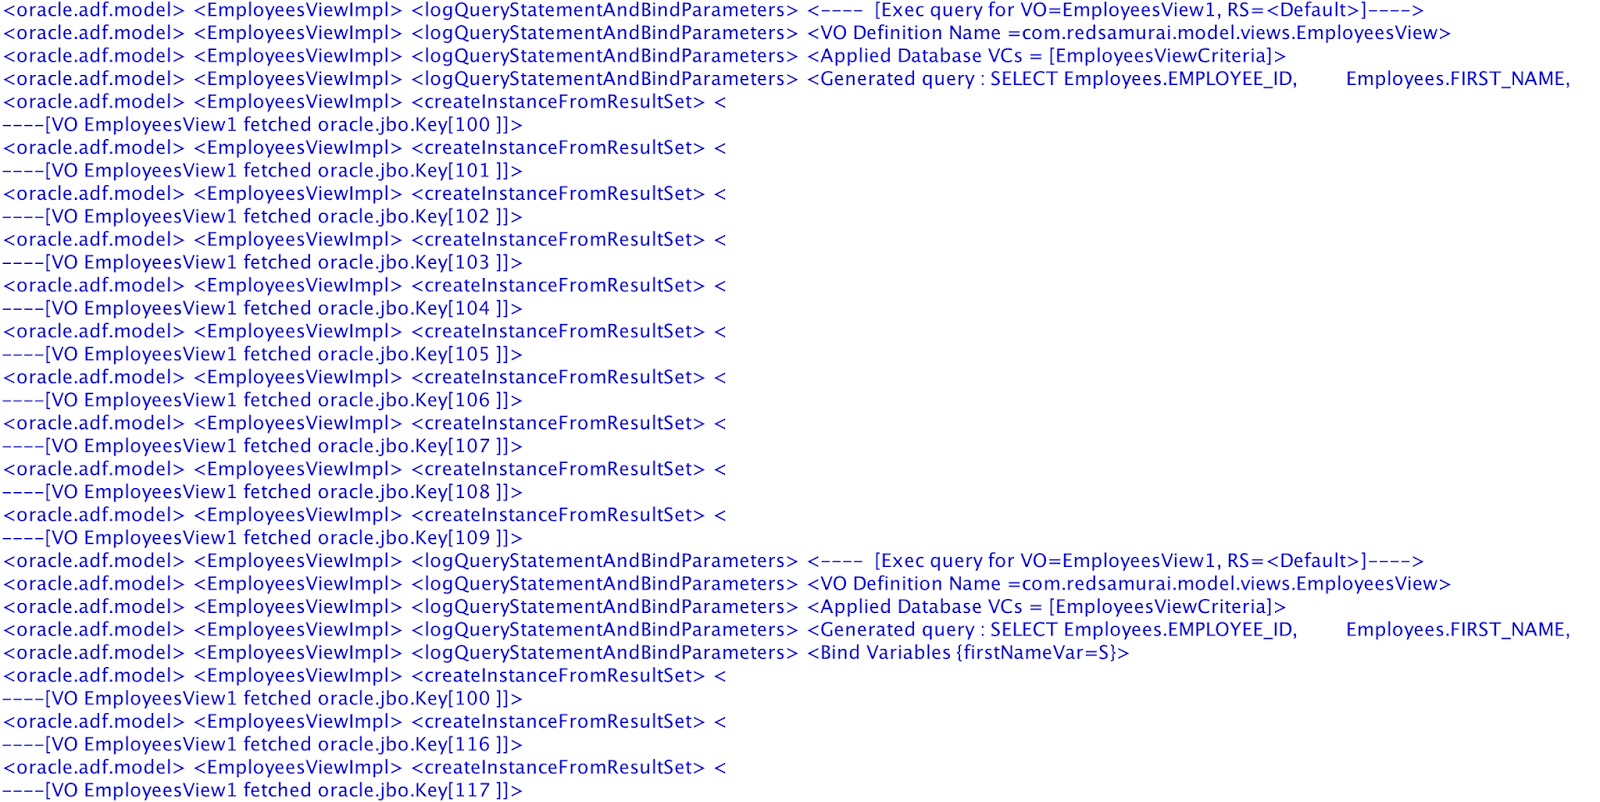
If you log SQL queries executed during form rendering, you will see two queries instead of expected one. First query is executed without bind variables, while second gets correct bind variable assigned:


What is the cause for first query without bind variables? It turns out - iterator (with setting Refresh = deferred) from page definition mapped with TF method call is causing this. Somehow iterator is initialized not at the right time, when bind variable is not assigned yet and this causing blind SQL call:


Workaround is to set Refresh = never:


With Refresh = never, only one query is executed as expected, with bind variable assigned:


This may look minor, but trust me - with complex queries such fix could be a great help for performance tuning. Avoid executing SQL queries without bind variables.

Download sample application - ADFTFCallBindingApp.zip.

Sunday, January 28, 2018

Oracle Offline Persistence Toolkit - Simple GET Response Example with JET

We have new tool from Oracle which can help to simplify offline logic implementation for JS apps.  In this post I will describe how to use Oracle Offline Persistence Toolkit with Oracle JET. However Offline Persistence is not constrained by JET usage only, this toolkit is available on NPM and can be integrated with other JS solutions.

I should emphasise - offline toolkit primary role is to enable mobile hybrid apps to work offline. In my opinion, toolkit usage doesn't stop here. It can enable user to continue his work, when internet connection is available, but back-end server goes down. Technically user would remain online in this case, but in practice application will be broken - no response from back-end for REST calls. Offline persistence toolkit could help to solve such cases - user could continue working with local cache, until back-end is down.

If you want to learn how offline toolkit works and how to use its API, go to GitHub page - check readme, add it to your JET app and try to run/test. Hands-on is the best way to learn something new.

I will share few hints and sample app.

As per readme, first of all you should add Offline Persistence Toolkit and PouchDB modules from NPM. Run these commands within JET app directory:

1. npm install @oracle/offline-persistence-toolkit

2. npm install pouchdb pouchdb-find

Next you should follow four simple configuration steps and enable JET app to be able to access offline toolkit API.

Step 1 (standard, when adding any additional module)

Add paths to newly added modules in main.js require block:


Step 2 (standard, when adding any additional module)

Add paths to newly added modules in main-release-paths.js:


Step 3 (standard, when adding any additional module)

Added modules would not be copied to build directory automatically. We need to define copying in oraclejet-build.js. Modules should go to build directory. If you need to copy files from given folder and subfolders, use ** for src:


Build content is located in web directory. Offline toolkit and PouchDB modules should be copied to build directory:


Step 4

Initialize window.PouchDB variable in main.js:


Configuration is complete, now we can use Offline Persistence Toolkit API. Add persistence store manager and other modules:


Simplest option is to rely on default fetch listener from offline toolkit. We need to register store factory and map endpoint which we want to cache with persistence manager. When back-end is available - call will go to back-end and response will be cached. Next time, of back-end is not available - data will be fetched from cache. Toolkit intercepts HTTP(-S) request and stores response, if end-point was configured to be listened:


I'm testing offline toolkit with simple Employees REST end-point call from JET. Toolkit allows to execute this call successfully, even if there is no back-end or no connection (of course - if same call was executed at least once before):


UI part is simple - displaying list, when data is fetched:


Data is fetched, we are online:


Offline toolkit will work, if REST response doesn't include Cache-Control header. Make sure there is no Cache-Control header set in response:


ADF BC REST by default sets Cache-Control header, you can remove it in Filter class (defined in ADF BC REST app):


Now I turned my connection to be offline, clicked on Get List button - JS calls REST and instead of getting network error, it executes successfully and returns data from cache through offline toolkit functionality:


You should open details for network call and check initiator. You will see that all calls mapped to offline endpoint are going through persistenceManager.js:


Let's double check - may be we are tricked somehow? Remove offline toolkit registration API in the code and re-run application:


As expected - network error is received and fetch fails. This proves - offline toolkit works :)


Sample JET application with offline toolkit configuration is available on GitHub (run ojet restore and ojet serve).

Tuesday, January 16, 2018

Linear Regression - Machine Learning with TensorFlow and Oracle JET UI Explained

Machine learning topic is definitely popular these days. Some get wrong assumptions about it - they think machine could learn by itself and its kind of magic. The truth is - there is no magic, but math behind it. Machine will learn the way math model is defined for learning process. In my opinion, the best solution is a combination of machine learning math and algorithms.  Here I could relate to chatbots keeping conversational context - language processing can be done by machine learning with neural network, while intent and context processing can be executed by programmable algorithms.

If you are starting to learn machine learning - there are two essential concepts to start with:

1. Regression
2. Classification

This post is focused around regression, in the next posts I will talk about classification.

Regression is a method which calculates the best fit for a curve to summarize data. Its up to you which type of curve to choose, you should assume which type will be most suitable (this can be achieved with trial and error too) based on given data set. Regression goal is to understand data points by discovering the curve that might have generated them.

In this example I will be using simplest regression possible - linear. Line is described by equation y = W*x + b. Where b is optional and can be 0 (line will cross (0, 0) point). For complex data sets, we might use polynomial equations and generate curves.

Here is Python code which implements linear regression with TensorFlow API (I have provided comments for all steps, reading code should be self explanatory):


Key element in any kind of machine learning - cost. The higher the cost, the worse is learning output. In linear regression, cost is typically defined by the sum of errors. The error in predicting x is calculated by the squared difference between the actual value f(x) and the predicted value M(w, x). The cost is the sum of squared differences between the actual and predicted values.

As you can see in the code above, we define cost function and ask TensorFlow to run optimizer to find the optimal values for model parameters. All the hard math calculation is happening in TensorFlow, our job is to prepare training data and choose right learning approach with correct equation.

Let's run JET UI, which talks to TensorFlow through REST. Training data is randomly generated (always 100 points) during each training session.

Training Epochs - number of learning iterations during training session
Learning rate - learning speed, smaller rate - more careful learning
W - learned model parameter to calculate equation y = W*x
Cost - value which shows how successful learning was, lower cost is better

1. We start from 1 training epoch and learning rate 0.001:


Learning result is not good - red line is result of linear regression, it doesn't represent best fit for training data. Cost is pretty high too, which indicates that learning wasn't successful.

2. 10 training epochs and learning rate 0.001:


As we repeat multiple learning iterations within the same training session - learning result is better. Cost becomes smaller and linear regression calculated line fits better, but still not ideal.

3. 100 training epochs and learning rate 0.001:


It helps to increase learning iterations, cost is significantly improving and line fits much better. This means outcome for W parameter learning is pretty good.

4. 1000 training epochs and learning rate 0.001


Let's make model to learn even harder and repeat more times - cost is becoming even better.

5. 2000 training epochs and learning rate 0.001


We could increase learning iterations further, but at some point it will not help. Learning process will start to suffer from overfitting. You can think about it - learning and repeating so many times, that at the end you start forgetting things. Cost is getting worse when repeating learning iterations further.

6. 2000 training epochs and learning rate 0.0001


It should help to make learning rate smaller, which result in more careful learning. This should allow to get better learning results with higher number of learning iterations. We get best learning cost result here and the most optimal line. You may ask - what is the use of that line? It can help to predict y values which were not available in training dataset.

7. 2000 training epochs and learning rate 0.01


On contrary if we increase learning rate, learning process will be faster - optimizer will run faster. This will result in decreased model output quality, cost will be higher and W parameter value will not produce such best fit line as in previous training run.

Few hints related to Oracle JET UI. You can achieve very good data visualization with JET chart components. For example I could control marker type rendered for training data points:


Line which represent learning result, can be displayed as reference line:


To display reference line, I'm using y-axis property which comes with JET chart:


References:

- Example for Linear Regression with Python and TensorFlow - Gist
- JET UI example - GitHub
- Accessing TensorFlow model through REST - Machine Learning with Oracle JET and TensorFlow
- Book - Machine Learning with TensorFlow