Wednesday, October 31, 2018

TypeScript Example in Oracle JET 6.0.0

JET 6.0.0 officially supports TypeScript, wow that great news. If you are building large JavaScript application with JET, it will be much easier to manage code with TypeScript - it does type checking and reports code errors during build time. Logic can be encapsulated into classes with inheritance. Read more about classes support in TypeScript.

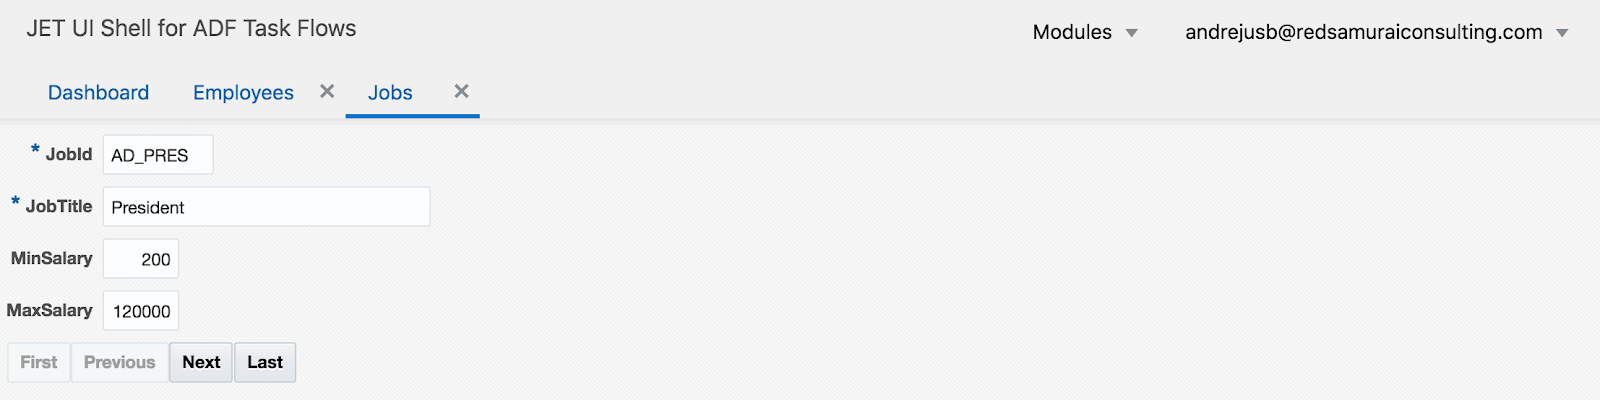
In this post I will share simple JET application enabled with TypeScript support. Sample application can be downloaded from GitHub repo. Before running it with ojet serve, make sure to execute ojet restore to install all dependent modules.

If you want to add TypeScript support to the new JET app, this can be achieved with npm command, executed in application root:

npm install @types/oracle__oraclejet

I would recommend to use Microsoft Visual Studio Code for Oracle JET development with TypeScript. IDE comes with very good support for TypeScript, it supports autocompletion, debugging - I'm sure it will make JET development faster.

To be able to use TypeScript, install it globally with this command (read more about various options - TypeScript setup):

npm install -g typescript

First step is to add tsconfig.json to the root folder of JET app. This configuration file enables TypeScript support in JET app. You can copy tsconfig.json from JET in TypeScript guide. I have updated outDir to my app folder structure, this allows to write translated JS file out of TypeScript directly into standard JET folder with JS files and override JS module:


Next we should create new TypeScript file (extension ts) under typescripts folder. File name should match existing JS module file name, in order for that JS target file to be overridden during TypeScript build:


TypeScript reports code errors during build time - for example, function name not found:


Visual Code provides auto completion for JET code, for example it helps to import module:


In TypeScript we can define classes. Variables can be created as objects of certain class, this helps to define input parameter types and do strict type checks when passing these variables into functions. Study this simple code example written in TypeScript, take a look how observable variable is defined:


Visual Code offers build command to translate TypeScript code into JS:


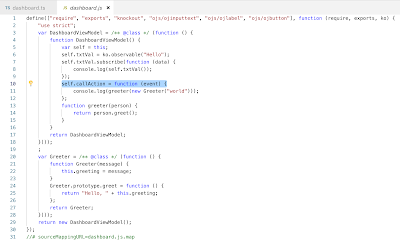
Once build completes, we get translated JS code associated with JET module. Take a look how class was translated. See how callAction function was translated with event input parameter:


HTML part of JET module remains same as without TypeScript:


Observable variable change is handled in TypeScript:


Action listener is invoked and function with class type parameter is called:

Tuesday, October 30, 2018

ADF 19 Demo from Oracle Open World San Francisco

ADF 19 was announced by Shay Shmeltzer at OOW'18. Expect to have many bug fixes and improvements in this release. I have recorded two videos demonstrating:

1. Client side responsive layout
2. Vertical tabs with text labels
3. ADF list with swipe option
4. New client side date components
5. Client LOVs with search and custom result list

Part I demo:


Part II demo:


Slides from the session:

1. Oracle ADF 19 - What's Next


2. What's New in ADF Faces

Friday, October 19, 2018

ADF Task Flow Performance Boost with JET UI Shell Wrapper

ADF application with UI Shell and ADF Task Flows rendered in dynamic tabs would not offer instant switch from one tab to another experience. Thats because tab switch request goes to the server and only when browser gets response - tab switch happens. There is more to this - even if tab in ADF is not currently active (tab is disclosed), tab content (e.g. region rendered from ADF Task Flow) still may participate in the request processing. If user opens many tabs, this could result in slightly slower request processing time overall.

ADF allows to render ADF Task Flows directly by accessing them through URL, if it is configured with page support on the root level. ADF Task Flow can be accessed by URL, this means we can include it into iframe. Imagine using iframe for each tab and rendering ADF Task Flows inside. This will enable ADF Task Flow independent processing in each tab, similar to opening them in separate browser tab.

Iframe can be managed in Oracle JET, using plain JavaScript and HTML code. My sample implements dynamic JET tabs with iframe support. Iframe renders ADF Task Flow. While navigating between tabs, I simply hide/show iframes, this allows to keep the state of ADF Task Flow and return to the same state, when opening back the tab. Huge advantage in this case - tab navigation and switching between tabs with ADF Task Flows works very fast - it takes only client time processing. Look at this recorded gif, where I navigate between tabs with ADF content:


Main functions are listed below.

1. Add dynamic iframe. Here we check if frame for given ADF Task Flow is already created, if no we create it and append to HTML element


2. Select iframe, when switching tabs. Hide all frames first, select frame which belongs to the selected tab


3. Remove iframe. Remove frame, when tab is closed


4. Select frame after remove. This method helps to set focus to the next frame, after current tab was removed


We can control when iframe or regular JET module is rendered, by using flag computed function assigned to main div:


In this app I have defined static URL's for displayed ADF Task Flows. Same can be loaded by fetching menu, etc.:


To be able to load ADF Task Flow by URL, make sure to use ADF Task Flow with page (you can include ADF region with fragments into that page). Set url-invoke-allowed property:


This is how it looks like. By default, JET dashboard module is displayed, select item from the menu list to load tab with ADF Task Flow:


JET tab rendering iframe with ADF table:


You can monitor ADF content loading in iframe within JET application:


JET tab rendering iframe with ADF form:


Download sample app from GitHub repository.

Wednesday, October 10, 2018

Oracle Offline Persistence Toolkit - Applying Server Changes

This is my final post related to Oracle Offline Persistence Toolkit. I will show simple example, which explains how to apply server changes, if data conflict comes up. Read previous post about - Oracle Offline Persistence Toolkit - Submitting Client Changes.

To apply server changes is easier, than to apply client changes. You need to remove failed request from sync queue and fetch server data to client by key.

Example of data conflict during sync:


User decides to cancel his changes and bring data from the server. GET is executed to fetch latest data and push it to the client:


In JS code, first of all we remove request from sync queue, in promise we read key value for that request and then refetch data:


Download sample code from GitHub repository.

Sunday, October 7, 2018

Oracle Offline Persistence Toolkit - Submitting Client Changes

One of the key topics related to Oracle Offline Persistence toolkit - submitting client changes to backend when data conflict exists. If data was updated on the backend, while client was offline and client wants to submit his changes - we inform about the conflict and ask what client really wants to do. If client choose to submit changes, this means we should push client changes to the backend with the latest change indicator.

There is a special case, when client updates same data multiple times while offline - during online sync we need to make sure, change indicator will be retrieved in after sync and applied in before sync listeners, to make sure subsequent requests execute correctly. Check my previous post about before request sync listener - Oracle Offline Persistence Toolkit - Before Request Sync Listener.

Example - let's update a record and submit change to the backend:


Assume another user is offline and updates same record:


User updates same record again, before going online. Now we will have two requests in the sync queue:


Once going online, sync will be executed and we will get conflict for the first request (same row was updated already by another user). At this moment, after sync listener will get info about conflict and will cache latest change indicator value returned from backend. If user decides to apply his changes, requests is removed, new request is constructed with the latest change indicator value received from backend and this request is inserted into sync queue:


If same record was updated multiple times, second request will fail too - because this request wasn't updated yet with latest change indicator:


Assuming user decided to apply changes from the second request too, we will update request with latest change indicator and submit it for sync. In after sync listener, change indicator value stored in local cache will be updated.

Successful sync with change indicator = 296:


New change indicator value will be retrieved in after sync listener and applied in before sync listener for the second request, updating same data row:


Here is the code, which allows user to apply changes to backend. We remove failed request, update it and create new request in sync queue, resuming sync process:


Download sample code for the described use case from my GitHub repository.

Tuesday, October 2, 2018

Oracle Offline Persistence Toolkit - Before Request Sync Listener

One more post from me related to Oracle Offline Persistence Toolkit. I already described how after request listener could be useful to read response data after sync - Oracle Offline Persistence Toolkit - After Request Sync Listener. Today will explain when before request listener could be useful. Same as after request listener, it is defined during persistence manager registration:


Before request listener must return promise. We can control resolved action. For example if there is no need to update request, we simply return continue. We would need to update request, if same row is updated multiple times during sync. Change indicator value must be updated in request payload. We read latest change indicator value from array, initialised in after request listener. Request payload is converted to JSON, value updated and then we construct new request and resolve it with replay. API allows to provide new request, by replacing original:


Here is the use case. While offline - update value:


While remaining offline, update same value again:


We should trace executed requests during sync, when going online. First request, initiated by first change is using change indicator value 292:


Second request is using updated change indicator value 293:


Without before and after request listener logic, second request would execute with same change indicator value as the first one. This would lead to data conflict on backend.

Sample application code is available on GitHub.