Showing posts with label Mobile. Show all posts

Thursday, May 18, 2017

Oracle JET Hybrid - NavDrawer Template Menu/Header Structure

Oracle JET provides NavDrawer template for Web and for Hybrid. Read how to create JET Hybrid application based on template - Create a Hybrid Mobile Application. There is significant difference in NavDrawer template implementation when we compare Web and Hybrid application.

Hybrid template draws menu structure on top of the form. Web template is pushing form to the right, when menu is opened. Such approach works fine on the Web, but you would see significant UI lag each time when menu item is selected. Probably thats the reason why hybrid NavDrawer template draws menu on top of the form - visually this provides better performance when switching between menu items. Menu is rendered on the top of the form in JET Hybrid Nav Drawer template:


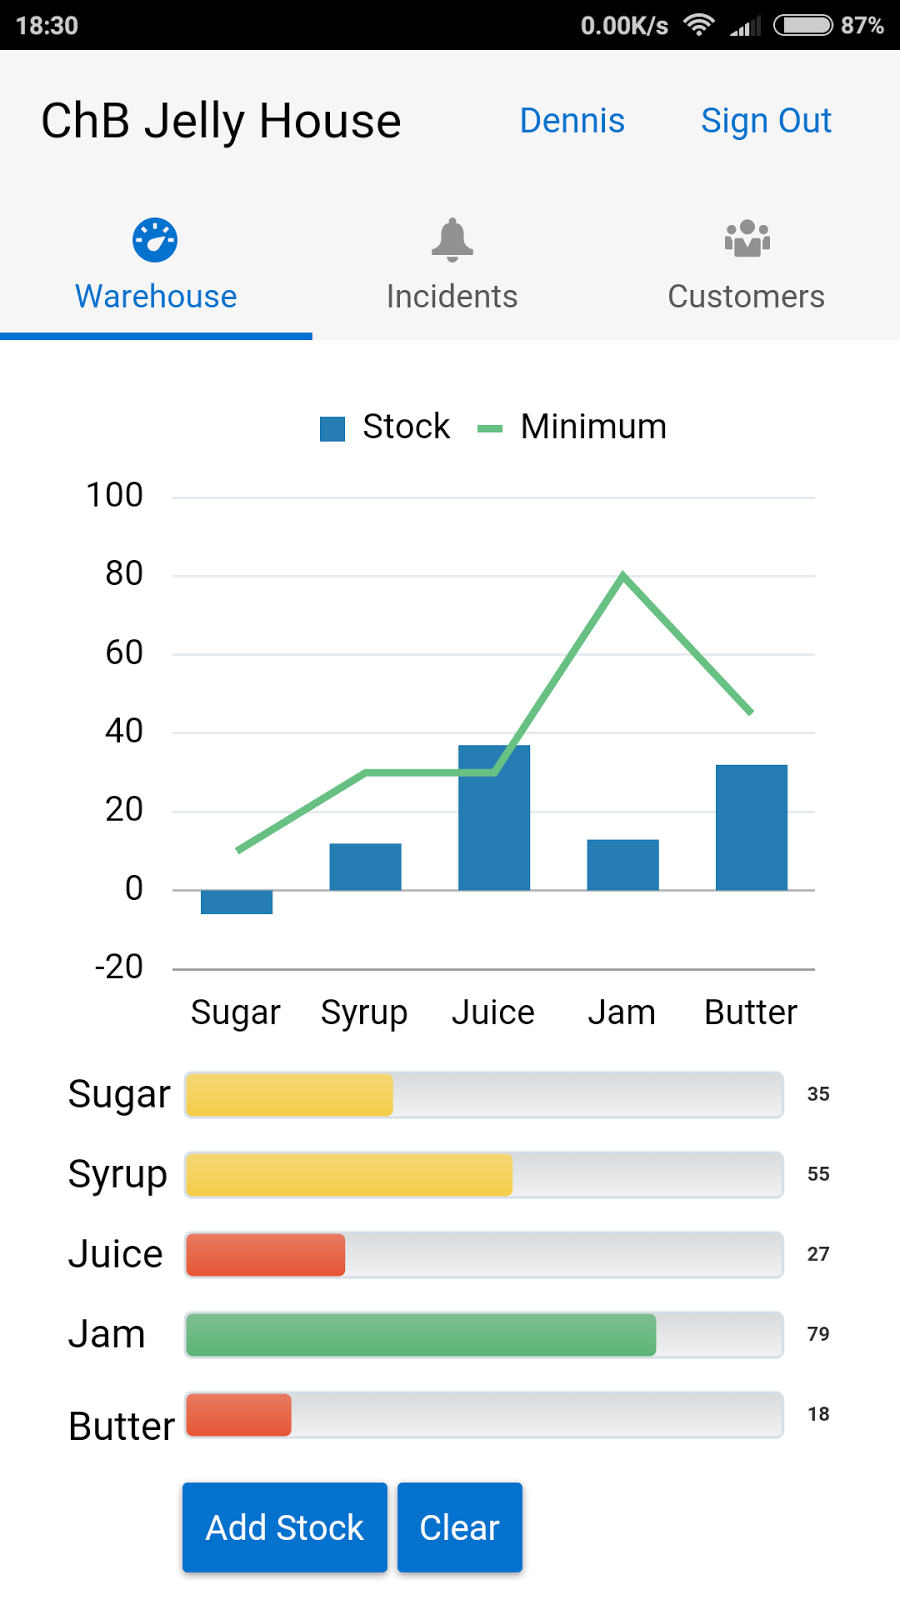
Form is loaded instantly, when menu item is selected. Header in JET Hybrid NavDrawer template stays fixed, it doesnt scroll. This gives good opportunity to put there common actions:


NavDrawer template in JET Web application moves form to the right, when menu is opened - thats the main visual difference when comparing to NavDrawer Hybrid:


Index page of NavDrawer hybrid template is almost identical to Web NavDrawer, except that it doesn't contain header part. Header is implemented separate module:


I have customized default header implementation with additional items - logo and user preferences:


Header module is constructed in appController, this is how it is generated by default. If we want to have access to variables/functions from appController in the header, we need to create a mapping:


Every module must include div with fixed top JET CSS class (thats why it doesnt scroll and stays on top), where you would copy header code:


Header is bind with module, which is defined by headerConfig variable (must be located in each module) - which is initialized in appController:


Thats all about menu/header implementation.

Let's learn how to push update to Google Play. Make sure to increase application version in Cordova config.xml file:


Go to Google Play and upload new APK, it will be parsed and Google Play automatically will deactivate previous version:


You can initiate roll-out to production:


This will push new release to Google Play. Users will be automatically notified about new version:


Version 2 of our JET Hybrid app is available on Google Play:

Wednesday, May 10, 2017

Oracle JET Hybrid Mobile Application on Google Play

Oracle JET Hybrid mobile application can be published to Google Play and installed on Android device. We have tested this process from beginning to the end. Of course JET Hybrid mobile app can be published on Apple Store too, but we are using Google Plain and Android for now.

Where to get started if you want to publish your own Oracle JET Hybrid (open source and free to use) mobile app? First of all you need to build APK (if building for Android) file in release mode. Read about it in my previous post - How To Package JET Hybrid Mobile Application for Release (Android Platform).

Search for JellyHouse in Google Play to install and test our JET app:


You can use demo data account redsam/welcome1 to login and check how JET runs on your Android mobile:


Let's walk through the main steps about how to upload and publish JET APK file in Google Play. First of all you need to login into Google Play Developer console and pay license fee 25 USD (if you are publishing first time). Second, prepare APK file compiled in release mode (read above how to do it). APK file typically is located in hybrid folder, build/outputs directory:


In Google Play Developer console create new application - press Create Application button:


Before you could publish APK to Google Play, you will be asked to complete various forms with information about the app, content rating and upload application graphics:


APK file is uploaded under Release Management -> Artifact library:


To verify upload, click on show details icon and you should see additional information for uploaded APK:


There are options to manage test releases. But you could opt out directly for production - this is what I did. Press publish button and wait about 30 - 60 minutes. Status should be changed to published:


Once published, search for your app in Google Play. Google Play for JellyHouse app:

Sunday, May 7, 2017

How To Package JET Hybrid Mobile Application for Release (Android Platform)

If you want to build/package JET Hybrid application you must issue build:release or serve:release command. Read more about it in JET developer guide: Packaging Hybrid Mobile Applications. In order to run build:release or serve:release commands successfully, you need create buildConfig.json file, which includes information about self signed certificate. This allows to sign application and package it for release.

Steps below are tested for Android platform.

You can generate certificate with Java keytool utility. Navigate to Java home bin folder and run keytool. Specify correct path and preferred alias:

keytool -genkey -v -keystore /Users/andrejusbaranovskis/jdeveloper/mywork/jellyhouse-release-key.keystore -alias RedSamuraiConsulting -keyalg RSA -keysize 2048 -validity 10000

You will be asked to enter additional information, such as name, organization, location, etc.:


Once certificate is generated, you can create empty buildConfig.json file. I have created it in the root directory of JET Hybrid application. Certificate file is copied into the same location:


Provide release information in buildConfig.json. Since certificate file is located in the same folder, it is enough to specify its name without path. Include alias name, certificate password and keystore password:


If buildConfig.json contains correct entries, build:release should run successfully:

sudo grunt build:release --platform=android --buildConfig=buildConfig.json

Successful result output:


JET Hybrid release app built for Android platform size is 7.5 MB (major part takes Cordova libraries):


So, if you create self signed certificate and populate buildConfig.json correctly - it is very easy to run release build for Oracle JET Hybrid application.

Thursday, April 13, 2017

Production Mobile App with Oracle JET Hybrid in 2 Hours

Do you want to know a secret, how to build mobile application just in 2 hours? Use Oracle JET Hybrid. Beauty of Oracle JET Hybrid - you can reuse the same source code (HTML and JS) from regular JET application. JET UI is responsive out of the box and this allows to render JET screens from the Web on mobile device without changes.

We were using our JET 3.0.0 production app - Red Samurai and Oracle PaaS JCS Success - JET/ADF BC REST Cloud Production Application and created mobile app version. This process took around 2 hours.

Below I will list steps required to create JET Hybrid mobile app out of existing JET app.

1. Execute sudo npm -g install cordova to add Cordova to JET tooling

2. Execute sudo yo oraclejet:hybrid --platforms=android to create new JET Hybrid application. Windows and iOS are supported as well

3. Copy HTML and JS files from src folder of JET app into src folder of JET Hybrid app. Structure of JET Hybrid app with HTML and JS files:


4. Execute sudo grunt build --platform=android to compile JET Hybrid app

5. Execute sudo grunt serve --platform=android --destination=device to deploy JET Hybrid app to mobile device. If you are deploying to Android, you need to have Android tools installed on your machine

Dashboard screen on mobile device, built with JET data visualization components:


Customer setup screen contains JET search list and various input components with validation:


JET dialog looks good in mobile too, with input number fields:


JET input date component on mobile screen:


JET table with pagination is rendered very well and is easily usable on the small screen:


I should say - we are very happy with JET Hybrid functionality. It allows to reuse JET application code and build mobile app very fast.

Tuesday, September 20, 2016

Slides Available - End-to-End Cloud: Oracle Java Cloud, Oracle Mobile Cloud Service, Oracle MAF, and Oracle JET [CON2388]

I have completed my OOW'16 session [CON2388] today. For those of you who could not attend it, check slides online (I will post sample code later, read more about the session here):


Wednesday, September 7, 2016

Speaking on Oracle OOW'16 - MCS, JET, ACS, JCS and MAF

With Oracle Open World'16 around the corner, I have prepared demo use case including Mobile Cloud Service (MCS), JavaScript Extension Toolkit (JET), Application Cloud Service (ACS) and Java Cloud Service (JCS). I will describe what Oracle Cloud offers to implement end-to-end enterprise solution.

This year I will be speaking on two sessions.

- End-to-End Cloud: Oracle Java Cloud, Oracle Mobile Cloud Service, Oracle MAF, and Oracle JET [CON2388]

Monday, Sep 19, 12:30 p.m. - 1:15 p.m. | Moscone West - 2012

I will be co-presenting and talking about Oracle JET Hybrid implementation:

- Building Enterprise-Grade Mobile Apps with Oracle JET and Cordova [CON5731]

Thursday, Sep 22, 12:00 p.m. - 12:45 p.m. | Moscone West - 2016

Demo use case will be based on JET application running on Application Container Cloud and integrated with Mobile Cloud Service (MCS) REST services:


There will be JET Hybrid application listening for MCS notifications:


You will learn how to process notifications:


Display and synch data from MCS in JET Hybrid application:


Functionality to be described during [CON2388] session:

MAF:

- Integration with MCS

JCS:

- ADF BC REST development and deployment
- Security implementation

ACS:

- JET application depoyment process with Node.JS application

JET:

- JET application implementation tips & tricks
- JET oAuth security integration with MCS
- JET and REST calls
- JET and MCS notifications

MCS:

- Custom API implementation tips & tricks
- Security configuration
- MCS DB API
- MCS Notifications API
- MCS Connector API to call ADF BC REST

Monday, August 1, 2016

Oracle MCS with ADF BC REST Connector

We already learned how to deploy and access ADF BC REST services from Oracle Java Cloud - ADF BC REST 12.2.1.0 Running Live in Oracle Java Cloud. It's time to see how ADF BC REST can be consumed by Oracle Mobile Cloud Service (MCS). In my point of view, key benefit of MCS is ability to simplify Web Service access for mobile clients, by aggregating these Web Services from different sources and simplifying them. I will try to describe it in very structure way, how to define MCS interface based on ADF BC REST.

Let's start from the top - MCS Web Service interface visible to mobile clients. I have defined four endpoints in MCS, based on ADF BC REST service - list of employees, new employee, employee by ID and update employee. As you can see from MCS tester, implementation details are hidden from the user and you would not know there is ADF BC REST is working in the background.

POST

Create new record. Data is supplied through Body:


You should see newly created record data in the response:


PATCH

Update existing record by ID. If value is invalid, ADF BC REST returns validation message:


When we fix value and try to update again, attribute value is changed:


GET by ID

This can be used to fetch resource by key:


GET

Returns a list of resources


At this point you should be familiar with implemented endpoints. Next I will describe how REST Connector, Custom API and Mobile Backend are configured in MCS.

REST Connector

Connector is defined to point to ADF BC REST service deployed on Oracle Java Cloud. We need connector in order to be able to call external Web Service. Connector is named as EmployeesList:


ADF BC REST service is protected by ADF Security. For this reason there is one rule defined to provide authorization header for REST requests:


Custom API

This is a proxy between connector calling external Web Service and service exposed to mobile client. Here we define available endpoints and implement calls to connectors or other MCS services (storage, notifications, etc.) through Node.js:


Endpoints for REST service are defined here, same ones as described above in MCS tester. We have /employees and /employees/{employeeId} endpoints:


Endpoint /employees is suppose to return a list of employees, without specifying a key or to execute POST to create new employee. GET method is defined to return list of employees:


POST method is defined for /employees and is supposed to create new employee:


GET method for /employees/{employeeid} is supposed to return employee by ID:


PATCH method for /employees/{employeeid} is supposed to update attributes for given employee:


Next important thing in custom API is implementation. This is the place where Node.js transformation between Web Service connector and MCS interface is defined. It can't be edited directly in the cloud, you should download JavaScript package to your environment and edit there. Upload it back when done. Download implementation for my sample app - employees_v3.0.zip:


Let's check implementation. This is the structure of implementation archive. JavaScript file employees.js contains implementation for MCS endpoint interaction with REST connector. JSON file package.json provides metadata for the implementation:


Endpoint GET method is implemented to call EmployeeList connector and to retrieve Employees resource (by calling GET). ADF BC REST supports onlyData=true parameter to return data only, we can pass it through HTTP parameters. Callback for successful result transfers data from REST connector to MCS:


GET by ID is implemented in similar way. Only difference - we add EmployeeId to Employees resource, this constructs REST URL Employees/100:


PATCH is a bit more complex. It needs to set Employee ID, pass request body (with JSON String including attributes to update) and specify ADF BC REST supported Content-Type. This makes it easy for mobile consumer, no need to worry about such things as Content-Type, etc. There is also option to log data, it could be useful for debugging purposes:


POST is pretty much similar to PATCH, it calls post method through connector:


Read more about Connector API in developer guide - Calling Connector APIs from Custom Code.

You must explicitly register Connector to be accessible from API implementation, this is done in package.json:


Mobile Backend

I will show how to read debug messages logged in Mobile Backend, when testing endpoints defined by Custom API. We execute PATCH:


All operations are executed through Mobile Backend, this is the place where we can check statistics and see the flow of REST calls and other actions:


These five actions where invoked during PATCH. You can see payload body content printed, this is done from Custom API implementation function: