Wednesday, November 28, 2018

Notification Messages in Oracle JET

Let's take a look into cool component available in Oracle JET - notification messages (it is possible to display messages in different ways - inline or overlay. Check more about messages functionality in JET Cookbook example).

This is how notifications messages are showing up, very cool way to send information to the user:


Messages are implemented with oj-messages components. This component accepts observable array of messages to be displayed. We can specify how message is displayed (notification in this case), position information and close listener (where we can remove message info entry from messages array):


In sample processAction function I'm pushing new entries into messages array. To simulate delay for second message, pushing second entry with 1 second delay. Once message is closed after standard delay time - function closeMessageHandler is invoked, where we are removing entry from array:


Sample application code is available on my GitHub repo.

Monday, November 26, 2018

Our new product - Katana 18.1 (Machine Learning for Business Automation)

Big day. We announce our brand new product - Katana. Today is first release, which is called 18.1. While working with many enterprise customers we saw a need for a product which would help to integrate machine learning into business applications in more seamless and flexible way. Primary area for machine learning application in enterprise - business automation.


Katana offers and will continue to evolve in the following areas:

1. Collection of machine learning models tailored for business automation. This is the core part of Katana. Machine learning models can run on Cloud (AWS SageMaker, Google Cloud Machine Learning, Oracle Cloud, Azure) or on Docker container deployed On-Premise. Main focus is towards business automation with machine learning, including automation for business rules and processes. Goal is to reduce repetitive labor time and simplify complex, redundant business rules maintenance

2. API layer built to help to transform business data into the format which can be passed to machine learning model. This part provides API to simplify machine learning model usage in customer business applications

3. Monitoring UI designed to display various statistics related to machine learning model usage by customer business applications. UI which helps to transform business data to machine learning format is also implemented in this part

Katana architecture:


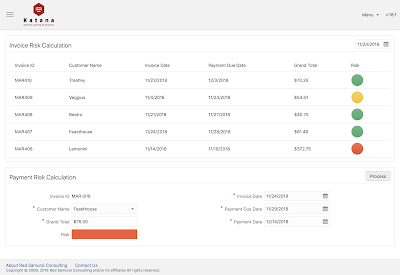
One of the business use cases, where we are using Katana - invoice payment risk calculation. UI which is calling Katana machine learning API to identify if invoice payment is at risk:


Currently we offer these machine learning models:

1. Invoice payment risk calculation

2. Automatic order approval processing

3. Sentiment analysis for user complaints

Get in touch for more information.

Sunday, November 25, 2018

Oracle ADF + Jasper Visualize.js = Awesome

This week I was working on a task to integrate Jasper Visualize.js into Oracle ADF application JSF page fragment. I must say integration was successful and Jasper report renders very well in Oracle ADF screen with the help of Visualize.js. Great thing about Visualize.js - it renders report in ADF page through client side HTML/JS, there is no iFrame. Report HTML structure is included into HTML generated by ADF, this allows to use CSS to control report size and make it responsive.

To prove integration, I was using ADF application with multiple regions - ADF Multi Task Flow Binding and Tab Order. Each region is loaded with ADF Faces tab:


One of the tabs display region with Jasper report, rendered with Visualize.js:


Check client side generated code. You should see HTML from Visualize.js inside ADF generated HTML structure:


It is straightforward to render Jasper report with Visualize.js in Oracle ADF. Add JS resource reference to Visualize.js library, define DIV where report supposed to be rendered. Add Visualize.js function to render report from certain path, etc.:


Sample code is available on my GitHub repo.

Tuesday, November 13, 2018

Amazon SageMaker Model Endpoint Access from Oracle JET

If you are implementing machine learning model with Amazon SageMaker, obviously you would want to know how to access trained model from the outside. There is good article posted on AWS Machine Learning Blog related to this topic - Call an Amazon SageMaker model endpoint using Amazon API Gateway and AWS Lambda. I went through described steps and implemented REST API for my own module. I went one step further and tested API call from JavaScript application implemented with Oracle JET JavaScript free and open source toolkit.

I will not go deep into machine learning part in this post. I will focus exclusively on AWS SageMaker endpoint. I'm using Jupyter notebook from Chapter 2 of this book - Machine Learning for Business. At the end of the notebook, when machine learning model is created, we initialize AWS endpoint (name: order-approval). Think about it as about some sort of access point. Through this endpoint we can call prediction function:


Wait around 5 minutes until endpoint starts. Then you should see endpoint entry in SageMaker:


How to expose endpoint to be accessible outside? Through AWS Lambda and AWS API Gateway.

AWS Lambda

Go to AWS Lambda service and create new function. I already have function, with Python 3.6 set for runtime. AWS Lambda acts as proxy function between endpoint and API. This is the place where we can prepare input data and parse response, before returning it to API:


Function must be granted role to access SageMaker resources:


This is function implementation. Endpoint name is moved out into environment variable. Function gets input, calls SageMaker endpoint and does some minimal processing for the response:


We can test lambda function and provide test payload. This is test payload I'm using. This is encoded list of parameters for machine learning model. Parameters describe purchase order. Model decides if manual approval is required or not. Decision rule - if PO was raised by someone not from IT, but they order IT product - manual approval is required. Read more about it in the book mentioned above. Test payload data:


Run test execution, model responds - manual approval for PO is required:


AWS API Gateway

Final step is to define API Gateway. Client will be calling Lambda function through API:


I have defined REST resource and POST method for API gateway. Client request will go through API call and then will be directed to Lambda function, which will make call for SageMaker prediction based on client input data:


POST method is set to call Lambda function (function with this name was created above):


Once API is deployed, we get URL. Make sure to add REST resource name at the end. From Oracle JET we can use simple JQuery call to execute POST method. Once asynchronous response is received, we display notification message:


Oracle JET displays prediction received from SageMaker - manual review is required for current PO:


Download Oracle JET sample application with AWS SageMaker API call from my GitHub repo.

Friday, November 9, 2018

Introduction to Oracle Digital Assistant Dialog Flow

Oracle Digital Assistant is a new name for Oracle Chatbot. Actually it is not only a new name - from now on chatbot functionality is extracted into separate cloud service - Oracle Digital Assistance (ODA) Cloud service. It runs separately now, not part of Oracle Mobile Cloud Service. I think this is a strong move forward - this should make ODA service lighter, easier to use and more attractive to someone who is not Oracle Mobile Cloud service customer.

I was playing around with dialog flow definition in ODA and would like to share few lessons learned. I extracted my bot definition from ODA and uploaded to GitHub repo for your reference.

When new bot is created in ODA service, first of all you need to define list of intents and provide sample phrases for each intent. Based on this information algorithm trains and creates machine learning model for user input classification:


ODA gives us a choice - to user simpler linguistics based model or machine learning algorithm. In my simple example I was using the first one:


Intent is assigned with entities:


Think about entity as about type, which defines single value of certain basic type or it can be a list of values. Entity will define type for dialog flow variables:


Key part in bot implementation - dialog flow. This is where you define rules how to handle intents and also how to process conversation context. Currently ODA doesn't provide UI interface to managed dialog flow, you will need to type rules by hand (probably if your bot logic is complex, you can create YAML structure outside of ODA). I would highly recommend to read ODA dialog flow guide, this is the most complex part of bot implementation - The Dialog Flow Definition.

Dialog flow definition is based on two main parts - context variables and states. Context variables - this is where you would define variables accessible in bot context. As you can see it is possible to use either basic types or our own defined type (entity). Type nlpresult is built-in type, variable of this type gets classified intent information:


States part defines sequence of stops (or dialogs), bot transitions from one stop to another during conversation with the user. Each stop points to certain component, there is number of built-in components and you could use custom component too (too call REST service for example). In the example below user types submit project hours, this triggers classification and result is handled by System.Intent, from where conversation flow starts - it goes to the dialog, where user should select project from the list. Until conversation flow stays in the context - we don't need to classify user input, because we treat user answers as input variables:


As soon as user selects project - flow transitions to the next stop selecttask, where we ask user to select task:


When task is selected - going to the next stop, to select time spent on this task. See how we are referencing previous answers in current prompt text. We can refer and display previous answer through expression:


Finally we ask a question - if user wants to type more details about task. By default all stops are executed in sequential order from top to bottom, if transition is empty - this means the next stop will execute - confirmtaskdetails in this case. Next stop will be conditional (System.ConditionEquals component), depending on user answer it will choose which stop to execute next:


If user chooses Yes - it will go to next stop, where user needs to type text (System.Text component):


At the end we print task logging information and ask if user wants to continue. If he answers No, we stop context flow, otherwise we ask user - what he wants to do next:


We are out of conversation context, when user types sentence - it will be classified to recognize new intent and flow will continue:


I hope this gives you good introduction about bot dialog flow implementation in Oracle Digital Assistant service.

Thursday, November 8, 2018

Managing Persisted State for Oracle JET Web Component Variable with Writeback Property

Starting from JET 6.0.0 Composite Components (CCA) are renamed to be Web Components (I like this new name more, it sounds more simple to me). In today post I will talk about Web Component writeback property and importance of it.

All variables (observable or not) defined inside Web Component will be reset when navigating away and navigating back to the module where Web Component is included. This means you can't store any values inside Web Component, because these values will be lost during navigation. Each time when we navigate back to module, all Web Components used inside that model will be reloaded, this means JS script for Web Component will be reloaded and variables will be re-executed loosing previous values. This behaviour is specific to Web Component only, values for variables created in the owning module will not be reset.

If you want to keep Web Component variable value, you will need to store variable state outside of Web Component. This can be achieved using Web Component property with writeback support.

Let's see how Web Component behaves on runtime. Source code is available on my GitHub repo.

Here I got basic Web Component included into dashboard module:


Web Component doesn't implement anything except JET switcher. Once switcher state is changed, variable is updated in JS script:


Variable which holds switcher state in Web Component:


Web Component is reloaded each time we navigate away and come back to the module - this means variables will be reset. This is how looks like - imagine we open module for the first time, switcher position is OFF:


Change it to be ON:


Navigate to any other module and come back - you will see that switcher is reset back to default OFF state, this means variable was reset (otherwise we should see ON state):


If you want to keep variable state, then it should be maintained outside of Web Component. To achieve this, create Web Component property to hold variable value, make sure set this property with writeback support:


For debugging purposes, add logging into Web Component, this will help to see when it will be reloaded:


Switcher variable must be initialized from Web Component property. Very first time it will be empty, but as soon as user will changed switcher state -  next time when Web Component is reloaded, it will assign correct value which was selected before:


When switcher state is changed, we need to handle this event and make sure that Web Component property is updated with new value:


Writeback property must be assigned with observable variable which is created in the module. Variable reference must be writable with {{}} brackets:


Once value will be changed inside Web Component, this change will be propagated up to observable variable defined in the module. Next time when we navigate away and come back to the module - we will pass recent value to the Web Component:


This is how it works now. Load module, change switcher state (see in the log -  Web Component was loaded once):


Navigate to any other module:


Come back to the module, where Web Component is included. See in the log - Web Component is reloaded, but switcher variable value is not lost, because it was saved to module observable variable through Web Component writeback property:

Wednesday, November 7, 2018

Machine Learning - Getting Data Into Right Shape

When you build machine learning model, first start with the data - make sure input data is prepared well and it represents true state of what you want machine learning model to learn. Data preparation task takes time, but don't hurry - quality data is a key for machine learning success. In this post I will go through essential steps required to bring data into right shape to feed it into machine learning algorithm.

Sample dataset and Python notebook for this post can be downloaded from my GitHub repo.

Each row from dataset represents invoice which was sent to customer. Original dataset extracted from ERP system comes with five columns:

customer - customer ID
invoice_date - date when invoice was created
payment_due_date - expected invoice payment date
payment_date - actual invoice payment date
grand_total - invoice total


invoice_risk_decision - 0/1 value column which describe current invoice risk. Goal of machine learning module will be to identify risk for future invoices, based on risk estimated for historical invoice data.

There are two types of features - categorical and continuous:

categorical - often text than number, something that represents distinct groups/types
continuous - numbers

Machine learning typically works with numbers. This means we need to transform all categorical features into continuous. For example, grand_total is continuous feature, but dates and customer ID are not.

Date can be converted to continuous feature by breaking it into multiple columns. Here is example of breaking invoice_date into multiple continuous features (year, quarter, month, week, day of year, day of month, day of week):


Using this approach all date columns can be transformed into continuous features. Customer ID column can be converted into matrix of 0/1. Each unique text value is moved into separate column and assigned with 1, all other column in that row are assigned with 0. This transformation can be done with Python library called Pandas, we will see it later.

You may or may not have decision values for your data, this depends how data was collected and what process was implemented in ERP app to collect this data. Decision column (invoice_risk_decision) value represents business rule we want to calculate with machine learning. See 0/1 assigned to this column:


Rule description:

0 - invoice was payed on time, payment_date less or equal payment_due_date
0 - invoice wasn't payed on time, but total is less than all invoices total average and payment delay is less or equal 10% for current customer average
1 - all other cases, indicates high invoice payment risk

I would recommend to save data in CSV format. Once data is prepared, we can load it in Python notebook:


I'm using Pandas library (imported through pd variable) to load data from file into data frame. Function head() prints first five rows from data frame (dataset size 5x24):


We can show number of rows with 0/1, this helps to understand how data set is constructed - we see that more than half rows represent invoices without payment risk:


Customer ID column is not a number, we need to convert it. Will be using Pandas get_dummies function for this task. It will turn every unique value into a column and place 0 or 1 depending on whether the row contains the value or not (this will increase dataset width):


Original customer column is gone, now we have multiple columns for each customer. If customer with ID = 4 is located it given row, 1 is set:


Finally we can check correlation between decision column - invoice_risk_decision and other columns from dataset. Correlation shows which columns will be used by machine learning algorithm to predict a value based on the values in other columns in the dataset. Here is correlation for our dataset (all columns with more than 10% correlation):


As you can see, all date columns have high correlation as well as grand_total. Our rule tells that invoice payment risk is low, if invoice amount is less than all total average - thats why correlation on grand_total value exist.

Customer with ID = 11 is the one with largest number of invoices, correlation for this customer is higher than for others, as expected.