Showing posts with label Cloud. Show all posts
Showing posts with label Cloud. Show all posts
Saturday, January 16, 2021
Connect to Oracle Cloud DB from Python
A quick explanation of how to connect to Oracle Autonomous Cloud Database (Always Free instance) from Python script.

Friday, December 11, 2020
Oracle JET or Oracle VBCS For Your Next Web App
I talk about my experience of working with Oracle JET and VBCS. I share a few hints - how to choose between Oracle JET and Oracle VBCS for your next Web app development.
Tuesday, December 1, 2020
Oracle Visual Builder Studio - Development Process Experience
I describe how you can handle the development process in Visual Builder Studio. It is really straightforward and very well defined.
Thursday, November 28, 2019
Multiple Node.js Applications on Oracle Always Free Cloud
What if you want to host multiple Oracle JET applications? You can do it easily on Oracle Always Free Cloud. The solution is described in the below diagram:

You should wrap Oracle JET application into Node.js and deploy it to Oracle Compute Instance through Docker container. This is described in my previous post - Running Oracle JET in Oracle Cloud Free Tier.
Make sure to create Docker container with a port different than 80. To host multiple Oracle JET apps, you will need to create multiple containers, each assigned with a unique port. For example, I'm using port 5000:
docker run -p 5000:3000 -d --name appname dockeruser/dockerimage
This will map standard Node port 3000 to port 5000, accessible internally within Oracle Compute Instance. We can direct external traffic from port 80 to port 5000 (or any other port, mapped with Docker container) through Nginx.
Install Nginx:
yum install nginx
Go to Nginx folder:
cd etc/nginx
Edit configuration file:
nano nginx.conf
Add context root configuration for Oracle JET application, to be directed to local port 5000:
location /invoicingdemoui/ {
proxy_pass http://127.0.0.1:5000/;
}
To allow HTTP call from Nginx to port 5000 (or other port), run this command (more about it on Stackoverflow):
setsebool -P httpd_can_network_connect 1
Reload Nginx:
systemctl reload nginx
Check Nginx status:
systemctl status nginx
That's all. Your Oracle JET app (demo URL) now accessible from the outside:


You should wrap Oracle JET application into Node.js and deploy it to Oracle Compute Instance through Docker container. This is described in my previous post - Running Oracle JET in Oracle Cloud Free Tier.
Make sure to create Docker container with a port different than 80. To host multiple Oracle JET apps, you will need to create multiple containers, each assigned with a unique port. For example, I'm using port 5000:
docker run -p 5000:3000 -d --name appname dockeruser/dockerimage
This will map standard Node port 3000 to port 5000, accessible internally within Oracle Compute Instance. We can direct external traffic from port 80 to port 5000 (or any other port, mapped with Docker container) through Nginx.
Install Nginx:
yum install nginx
Go to Nginx folder:
cd etc/nginx
Edit configuration file:
nano nginx.conf
Add context root configuration for Oracle JET application, to be directed to local port 5000:
location /invoicingdemoui/ {
proxy_pass http://127.0.0.1:5000/;
}
To allow HTTP call from Nginx to port 5000 (or other port), run this command (more about it on Stackoverflow):
setsebool -P httpd_can_network_connect 1
Reload Nginx:
systemctl reload nginx
Check Nginx status:
systemctl status nginx
That's all. Your Oracle JET app (demo URL) now accessible from the outside:

Saturday, October 19, 2019
Machine Learning with SQL
Python (and soon JavaScript with TensorFlow.js) is a dominant language for Machine Learning. What about SQL? There is a way to build/run Machine Learning models in SQL. There could be a benefit to run model training close to the database, where data stays. With SQL we can leverage strong data analysis out of the box and run algorithms without fetching data to the outside world (which could be an expensive operation in terms of performance, especially with large datasets). This post is to describe how to do Machine Learning in the database with SQL.

Read more in my Towards Data Science post.

Read more in my Towards Data Science post.
Wednesday, September 25, 2019
Running Oracle JET in Oracle Cloud Free Tier
OOW'19 stands up from recent years OOW conferences with important announcement - Oracle Cloud Free Tier offering. This offering includes two free DB instances and two free compute VM instances. What else you could wish for the side and hobby projects? This is a strong move by Oracle and it should boost Oracle Cloud. Read more about it in Oracle Cloud Free Tier page.

It was interesting to test how to deploy Oracle JET app to Oracle Always Free instance of compute VM. I will not go through the initial steps, related how to create VM instance and enable internet access (for the port 80). You can read all that in a nice write up from Dimitri Gielis post.
Assuming you already have created Oracle JET app and want to deploy it. One way would be to set up Node.js and Nginx on the compute VM and pull app source code from Git. I prefer another way - to go through Docker container, Nginx would act as HTTP server to redirect requests to Docker container port. But in this post for simplicity reasons, we are not going to look into Nginx setup - will focus only on JET deployment through Docker container.
1. Create an empty Node application (follow these steps):
express --view=pug
2. Add dependencies, go into the Node app and run:
npm install
3. Copy Oracle JET content from web folder into Node app public folder (remove existing files)
4. Inside Node app, adjust app.js file, comment out these lines:
var usersRouter = require('./routes/users');
app.set('view engine', 'pug');
app.use('/users', usersRouter);
5. Keep only index.js file in router folder
6. Remove template files from views folder
7. Update index.js file to redirect to Oracle JET index.html
router.get('/', function(req, res, next) {
//res.render('index', { title: 'Express' });
res.sendFile('index.html', {root: './public/'});
});
8. Note down port 3000 info from bin/www, this is the port Node app will run in Docker container
9. Create Dockerfile inside Node app folder (follow these steps). Content:
FROM node:10
# Create app directory
WORKDIR /usr/src/app
# Install app dependencies
# A wildcard is used to ensure both package.json AND package-lock.json are copied
# where available (npm@5+)
COPY package*.json ./
RUN npm install
# If you are building your code for production
# RUN npm ci --only=production
# Bundle app source
COPY . .
EXPOSE 3000
CMD [ "node", "./bin/www" ]
10. Create .dockerignore file. Content:
node_modules
npm-debug.log
11. Build Docker image locally, by running below command inside Node app:
docker build -t username/imagename -f ./Dockerfile .
12. Push Docker container to Docker Hub. This way we will be able to pull container from Oracle compute VM in the cloud:
docker push username/ imagename
---
Next steps are executed inside Oracle compute VM. You should connect through SSH to run below commands.
13. Install Docker (run sudo su):
yum install docker-engine
14. Enable Docker:
systemctl enable docker
15. Start Docker:
systemctl start docker
16. Check Docker status:
systemctl status docker.service
17. Check Docker version:
docker version
18. Login into Docker Hub, to be able to pull the container with Node app. If login doesn't work (access permission issue), run this command: sudo usermod -a -G docker $USER
docker login
19. Run container:
docker run -p 80:3000 -d --name appname username/imagename
Node app with Oracle JET content can be accessed by port 80 using public IP of your Oracle container VM: http://130.61.241.30/index.html
Oracle JET app runs on Oracle container VM free tier:


It was interesting to test how to deploy Oracle JET app to Oracle Always Free instance of compute VM. I will not go through the initial steps, related how to create VM instance and enable internet access (for the port 80). You can read all that in a nice write up from Dimitri Gielis post.
Assuming you already have created Oracle JET app and want to deploy it. One way would be to set up Node.js and Nginx on the compute VM and pull app source code from Git. I prefer another way - to go through Docker container, Nginx would act as HTTP server to redirect requests to Docker container port. But in this post for simplicity reasons, we are not going to look into Nginx setup - will focus only on JET deployment through Docker container.
1. Create an empty Node application (follow these steps):
express --view=pug
2. Add dependencies, go into the Node app and run:
npm install
3. Copy Oracle JET content from web folder into Node app public folder (remove existing files)
4. Inside Node app, adjust app.js file, comment out these lines:
var usersRouter = require('./routes/users');
app.set('view engine', 'pug');
app.use('/users', usersRouter);
5. Keep only index.js file in router folder
6. Remove template files from views folder
7. Update index.js file to redirect to Oracle JET index.html
router.get('/', function(req, res, next) {
//res.render('index', { title: 'Express' });
res.sendFile('index.html', {root: './public/'});
});
8. Note down port 3000 info from bin/www, this is the port Node app will run in Docker container
9. Create Dockerfile inside Node app folder (follow these steps). Content:
FROM node:10
# Create app directory
WORKDIR /usr/src/app
# Install app dependencies
# A wildcard is used to ensure both package.json AND package-lock.json are copied
# where available (npm@5+)
COPY package*.json ./
RUN npm install
# If you are building your code for production
# RUN npm ci --only=production
# Bundle app source
COPY . .
EXPOSE 3000
CMD [ "node", "./bin/www" ]
10. Create .dockerignore file. Content:
node_modules
npm-debug.log
11. Build Docker image locally, by running below command inside Node app:
docker build -t username
12. Push Docker container to Docker Hub. This way we will be able to pull container from Oracle compute VM in the cloud:
docker push username
---
Next steps are executed inside Oracle compute VM. You should connect through SSH to run below commands.
13. Install Docker (run sudo su):
yum install docker-engine
14. Enable Docker:
systemctl enable docker
15. Start Docker:
systemctl start docker
16. Check Docker status:
systemctl status docker.service
17. Check Docker version:
docker version
18. Login into Docker Hub, to be able to pull the container with Node app. If login doesn't work (access permission issue), run this command: sudo usermod -a -G docker $USER
docker login
19. Run container:
docker run -p 80:3000 -d --name appname
Node app with Oracle JET content can be accessed by port 80 using public IP of your Oracle container VM: http://130.61.241.30/index.html
Oracle JET app runs on Oracle container VM free tier:
Friday, June 7, 2019
Running Oracle JET on Heroku with Node.js (JET Showcase)
I have implemented JET (more about Oracle JET) showcase app with data visualization components usage. This app shows historical weather data in Boston city, the dataset is taken from Kaggle. Switching years makes data visualization to change and show new data - I love how polar chat is updated. Calendar displays temperature for each day during the year using JET picto chart component:

App is deployed on Heroku and available by this URL. Heroku provides $7 per month account with analytics and better resources, but there is a free option too (it comes with sleep after 30 minutes of inactivity) - free option is good for experimentation, as for this case.
Heroku dashboard for the deployed JET app:

Free deployment comes without analytics option:

App comes with two options - Dashboard and Histogram. The dashboard allows switching between years and shows a polar chart along with daily temperature calendar:

The histogram displays the same data in a different view:

This app comes with Web Component implementation, yes Web Components are a standard feature in JET. Toolbar, where you can switch years, is implemented as Web Component:

Web Component is being used in both UIs - dashboard and histogram:

Visualization components are getting data through Knockout.JS observable variables:

Variables are initialized in JS functions:

Resources:
1. Heroku deployment guide for Node.js
2. Node.js app which is deployed on Heroku - GitHub. JET content is inside the public folder. JET content is copied from JET app web folder, after running ojet build --release
3. Oracle JET app - GitHub

App is deployed on Heroku and available by this URL. Heroku provides $7 per month account with analytics and better resources, but there is a free option too (it comes with sleep after 30 minutes of inactivity) - free option is good for experimentation, as for this case.
Heroku dashboard for the deployed JET app:

Free deployment comes without analytics option:

App comes with two options - Dashboard and Histogram. The dashboard allows switching between years and shows a polar chart along with daily temperature calendar:

The histogram displays the same data in a different view:

This app comes with Web Component implementation, yes Web Components are a standard feature in JET. Toolbar, where you can switch years, is implemented as Web Component:

Web Component is being used in both UIs - dashboard and histogram:

Visualization components are getting data through Knockout.JS observable variables:

Variables are initialized in JS functions:

Resources:
1. Heroku deployment guide for Node.js
2. Node.js app which is deployed on Heroku - GitHub. JET content is inside the public folder. JET content is copied from JET app web folder, after running ojet build --release
3. Oracle JET app - GitHub
Tuesday, April 30, 2019
Run Oracle VBCS Application on Your Own Server
Latest VBCS release brings an option to export VBCS application and run on your own server (or different cloud provider). This is a truly strong step forward for VCBS. Read more about it in Shay Shmeltzer blog post. If you decide to keep running VBCS app within VBCS itself, then you get additional functionality of VBCS Business Services, Oracle Cloud security, etc. out of the box. If you export VBCS application and run on your own environment, these features are not included, but then you don't need to pay for VBCS Cloud runtime when hosting the app. It is great to have alternatives and depending on the customer either one or another of the use cases would work.
One of the use cases - customer even don't need to have its own VBCS instance. We could develop Oracle JET app in our VBCS instance, export and deploy it in the customer environment. Later we could provide support for version upgrade.
I have exported sample VBCS app with the external REST service call (REST service). Deployed app on our own server. You can try it yourself - http://138.68.79.219:7001/vbcsapp/webApps/countries/:

I must say it is simple to export VBCS app, no hassle at all. Make sure VBCS app you are exporting is set with anonymous access (this will disable Oracle Cloud security model). You will need to implement security and backend secure calls yourself:

Next go to REST service control and specify Bypass Proxy option (this will enable direct REST service call from VBCS app, bypassing Oracle Cloud proxy service). Important: to work with Bypass Proxy option, REST service must be invoked through HTTPS:

Nothing else on VBCS side. Next need to push application code to Oracle Developer Cloud Service Git repository and build artifact which can be exported. I suggest reading Shay Shmeltzer blog post about how to proceed with VBCS and Oracle Developer Cloud Service setup.
In VBCS do push to Git for the selected app:

If it is the first time with Oracle Developer Cloud Service, you will need to set up (refer to Shay post mentioned above) a build job. Create build job configuration, point to Git repo:

Provide a set of parameters for the build job:

Add Unix Shell script to the build job. This script will execute Node.js NPM command to run vb-build job to construct artifact which can be exported and deployed in your own environment. It is important to make sure that property values used in the script match property values defined in the build job earlier. To execute npm command, make sure to use Oracle Developer Cloud Service machine with Node.js support:

Run the job, once it completes and if there are no errors, go to job artifacts and download optimized.zip - this is the archive with VBCS application you can deploy:

Important: when exported VCBS application is accessed, it loads a bunch of scripts and executes HTTPS requests. There is one request which slows down VBCS application initial loading - call to _currentuser. It is trying to execute the _currentuser request on VBCS instance, but if the instance is down - it will wait until a timeout and only then will proceed with application loading. To fix that, search for _currentuser URL in the exported code and change URL to some dummy value, so that this request will fail immediately and will not keep VBCS application from continue loading:

One of the use cases - customer even don't need to have its own VBCS instance. We could develop Oracle JET app in our VBCS instance, export and deploy it in the customer environment. Later we could provide support for version upgrade.
I have exported sample VBCS app with the external REST service call (REST service). Deployed app on our own server. You can try it yourself - http://138.68.79.219:7001/vbcsapp/webApps/countries/:

I must say it is simple to export VBCS app, no hassle at all. Make sure VBCS app you are exporting is set with anonymous access (this will disable Oracle Cloud security model). You will need to implement security and backend secure calls yourself:

Next go to REST service control and specify Bypass Proxy option (this will enable direct REST service call from VBCS app, bypassing Oracle Cloud proxy service). Important: to work with Bypass Proxy option, REST service must be invoked through HTTPS:

Nothing else on VBCS side. Next need to push application code to Oracle Developer Cloud Service Git repository and build artifact which can be exported. I suggest reading Shay Shmeltzer blog post about how to proceed with VBCS and Oracle Developer Cloud Service setup.
In VBCS do push to Git for the selected app:

If it is the first time with Oracle Developer Cloud Service, you will need to set up (refer to Shay post mentioned above) a build job. Create build job configuration, point to Git repo:

Provide a set of parameters for the build job:

Add Unix Shell script to the build job. This script will execute Node.js NPM command to run vb-build job to construct artifact which can be exported and deployed in your own environment. It is important to make sure that property values used in the script match property values defined in the build job earlier. To execute npm command, make sure to use Oracle Developer Cloud Service machine with Node.js support:

Run the job, once it completes and if there are no errors, go to job artifacts and download optimized.zip - this is the archive with VBCS application you can deploy:

Important: when exported VCBS application is accessed, it loads a bunch of scripts and executes HTTPS requests. There is one request which slows down VBCS application initial loading - call to _currentuser. It is trying to execute the _currentuser request on VBCS instance, but if the instance is down - it will wait until a timeout and only then will proceed with application loading. To fix that, search for _currentuser URL in the exported code and change URL to some dummy value, so that this request will fail immediately and will not keep VBCS application from continue loading:

Saturday, January 12, 2019
On-Premise Machine Learning with XGBoost (Katana 19.1)
Happy to announce Katana 19.1 release with complete on-premise support for Machine Learning.

You can run Machine Learning (ML) models on Cloud (Amazon SageMaker, Google Cloud Machine Learning, etc.). I believe it is important to understand how to run Machine Learning in your own environment too. Without this knowledge ML skills set would not be complete. There are multiple reasons for this. Not everyone is using Cloud and you must provide on-premise solution. Without getting your hands dirty and configuring environment yourself, you would miss an exciting opportunity to learn more about ML.
Read more here.

You can run Machine Learning (ML) models on Cloud (Amazon SageMaker, Google Cloud Machine Learning, etc.). I believe it is important to understand how to run Machine Learning in your own environment too. Without this knowledge ML skills set would not be complete. There are multiple reasons for this. Not everyone is using Cloud and you must provide on-premise solution. Without getting your hands dirty and configuring environment yourself, you would miss an exciting opportunity to learn more about ML.
Read more here.
Monday, November 26, 2018
Our new product - Katana 18.1 (Machine Learning for Business Automation)
Big day. We announce our brand new product - Katana. Today is first release, which is called 18.1. While working with many enterprise customers we saw a need for a product which would help to integrate machine learning into business applications in more seamless and flexible way. Primary area for machine learning application in enterprise - business automation.

Katana offers and will continue to evolve in the following areas:
1. Collection of machine learning models tailored for business automation. This is the core part of Katana. Machine learning models can run on Cloud (AWS SageMaker, Google Cloud Machine Learning, Oracle Cloud, Azure) or on Docker container deployed On-Premise. Main focus is towards business automation with machine learning, including automation for business rules and processes. Goal is to reduce repetitive labor time and simplify complex, redundant business rules maintenance
2. API layer built to help to transform business data into the format which can be passed to machine learning model. This part provides API to simplify machine learning model usage in customer business applications
3. Monitoring UI designed to display various statistics related to machine learning model usage by customer business applications. UI which helps to transform business data to machine learning format is also implemented in this part
Katana architecture:

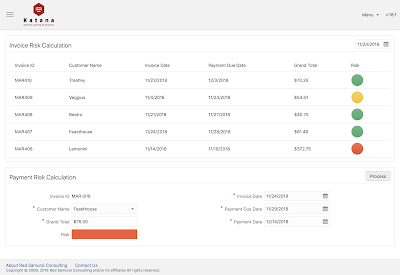
One of the business use cases, where we are using Katana - invoice payment risk calculation. UI which is calling Katana machine learning API to identify if invoice payment is at risk:

Katana offers and will continue to evolve in the following areas:
1. Collection of machine learning models tailored for business automation. This is the core part of Katana. Machine learning models can run on Cloud (AWS SageMaker, Google Cloud Machine Learning, Oracle Cloud, Azure) or on Docker container deployed On-Premise. Main focus is towards business automation with machine learning, including automation for business rules and processes. Goal is to reduce repetitive labor time and simplify complex, redundant business rules maintenance
2. API layer built to help to transform business data into the format which can be passed to machine learning model. This part provides API to simplify machine learning model usage in customer business applications
3. Monitoring UI designed to display various statistics related to machine learning model usage by customer business applications. UI which helps to transform business data to machine learning format is also implemented in this part
Katana architecture:

One of the business use cases, where we are using Katana - invoice payment risk calculation. UI which is calling Katana machine learning API to identify if invoice payment is at risk:

Currently we offer these machine learning models:
1. Invoice payment risk calculation
2. Automatic order approval processing
3. Sentiment analysis for user complaints
Get in touch for more information.
Friday, November 9, 2018
Introduction to Oracle Digital Assistant Dialog Flow
Oracle Digital Assistant is a new name for Oracle Chatbot. Actually it is not only a new name - from now on chatbot functionality is extracted into separate cloud service - Oracle Digital Assistance (ODA) Cloud service. It runs separately now, not part of Oracle Mobile Cloud Service. I think this is a strong move forward - this should make ODA service lighter, easier to use and more attractive to someone who is not Oracle Mobile Cloud service customer.
I was playing around with dialog flow definition in ODA and would like to share few lessons learned. I extracted my bot definition from ODA and uploaded to GitHub repo for your reference.
When new bot is created in ODA service, first of all you need to define list of intents and provide sample phrases for each intent. Based on this information algorithm trains and creates machine learning model for user input classification:

ODA gives us a choice - to user simpler linguistics based model or machine learning algorithm. In my simple example I was using the first one:

Intent is assigned with entities:

Think about entity as about type, which defines single value of certain basic type or it can be a list of values. Entity will define type for dialog flow variables:

Key part in bot implementation - dialog flow. This is where you define rules how to handle intents and also how to process conversation context. Currently ODA doesn't provide UI interface to managed dialog flow, you will need to type rules by hand (probably if your bot logic is complex, you can create YAML structure outside of ODA). I would highly recommend to read ODA dialog flow guide, this is the most complex part of bot implementation - The Dialog Flow Definition.
Dialog flow definition is based on two main parts - context variables and states. Context variables - this is where you would define variables accessible in bot context. As you can see it is possible to use either basic types or our own defined type (entity). Type nlpresult is built-in type, variable of this type gets classified intent information:

States part defines sequence of stops (or dialogs), bot transitions from one stop to another during conversation with the user. Each stop points to certain component, there is number of built-in components and you could use custom component too (too call REST service for example). In the example below user types submit project hours, this triggers classification and result is handled by System.Intent, from where conversation flow starts - it goes to the dialog, where user should select project from the list. Until conversation flow stays in the context - we don't need to classify user input, because we treat user answers as input variables:

As soon as user selects project - flow transitions to the next stop selecttask, where we ask user to select task:

When task is selected - going to the next stop, to select time spent on this task. See how we are referencing previous answers in current prompt text. We can refer and display previous answer through expression:

Finally we ask a question - if user wants to type more details about task. By default all stops are executed in sequential order from top to bottom, if transition is empty - this means the next stop will execute - confirmtaskdetails in this case. Next stop will be conditional (System.ConditionEquals component), depending on user answer it will choose which stop to execute next:

If user chooses Yes - it will go to next stop, where user needs to type text (System.Text component):

At the end we print task logging information and ask if user wants to continue. If he answers No, we stop context flow, otherwise we ask user - what he wants to do next:

We are out of conversation context, when user types sentence - it will be classified to recognize new intent and flow will continue:

I hope this gives you good introduction about bot dialog flow implementation in Oracle Digital Assistant service.
I was playing around with dialog flow definition in ODA and would like to share few lessons learned. I extracted my bot definition from ODA and uploaded to GitHub repo for your reference.
When new bot is created in ODA service, first of all you need to define list of intents and provide sample phrases for each intent. Based on this information algorithm trains and creates machine learning model for user input classification:

ODA gives us a choice - to user simpler linguistics based model or machine learning algorithm. In my simple example I was using the first one:

Intent is assigned with entities:

Think about entity as about type, which defines single value of certain basic type or it can be a list of values. Entity will define type for dialog flow variables:

Key part in bot implementation - dialog flow. This is where you define rules how to handle intents and also how to process conversation context. Currently ODA doesn't provide UI interface to managed dialog flow, you will need to type rules by hand (probably if your bot logic is complex, you can create YAML structure outside of ODA). I would highly recommend to read ODA dialog flow guide, this is the most complex part of bot implementation - The Dialog Flow Definition.
Dialog flow definition is based on two main parts - context variables and states. Context variables - this is where you would define variables accessible in bot context. As you can see it is possible to use either basic types or our own defined type (entity). Type nlpresult is built-in type, variable of this type gets classified intent information:

States part defines sequence of stops (or dialogs), bot transitions from one stop to another during conversation with the user. Each stop points to certain component, there is number of built-in components and you could use custom component too (too call REST service for example). In the example below user types submit project hours, this triggers classification and result is handled by System.Intent, from where conversation flow starts - it goes to the dialog, where user should select project from the list. Until conversation flow stays in the context - we don't need to classify user input, because we treat user answers as input variables:

As soon as user selects project - flow transitions to the next stop selecttask, where we ask user to select task:

When task is selected - going to the next stop, to select time spent on this task. See how we are referencing previous answers in current prompt text. We can refer and display previous answer through expression:

Finally we ask a question - if user wants to type more details about task. By default all stops are executed in sequential order from top to bottom, if transition is empty - this means the next stop will execute - confirmtaskdetails in this case. Next stop will be conditional (System.ConditionEquals component), depending on user answer it will choose which stop to execute next:

If user chooses Yes - it will go to next stop, where user needs to type text (System.Text component):

At the end we print task logging information and ask if user wants to continue. If he answers No, we stop context flow, otherwise we ask user - what he wants to do next:

We are out of conversation context, when user types sentence - it will be classified to recognize new intent and flow will continue:

I hope this gives you good introduction about bot dialog flow implementation in Oracle Digital Assistant service.
Thursday, July 19, 2018
Oracle VBCS - Pay As You Go Cloud Model Experience Explained
If you are considering starting using VBCS cloud service from Oracle, may be this post will be useful. I will share my experience with pay as you go model.
Two payment models are available:
1. Pay As You Go - good when accessing VBCS time to time. Can be terminated at any time
2. Monthly Flex - good when need to run VBCS 24/7. Requires commitment, can't be terminated at any time
When you create Oracle Cloud account, initially you will get 30 days free trial period. At the end of that period (or earlier), you can upgrade to billable plan. To upgrade, go to account management and choose to upgrade promotional offer - you will be given choice to go with Pay As You Go or Monthly Flex:

As soon as you upgrade to Pay As You Go, you will start seeing monthly usage amount in the dashboard. Also it shows hourly usage of VBCS instance, for the one you will be billed:

Click on monthly usage amount, you will see detail view per each service billing. When VBCS instance is stopped (in case of Pay As You Go) - you will be billed only for hardware storage (Compute Classic) - this is relatively very small amount:

There are two options, how you can create VBCS instance - either autonomous VBCS or customer managed VBCS. To be able to stop/start VBCS instance and avoid billing when instance is not used (in case of Pay As You Go) - make sure to go with customer managed VBCS. In this example, VBCS instance was used only for 1 hour and then it was stopped, it can be started again at anytime:

To manage VBCS instance, you would need to navigate to Oracle Cloud Stack UI. From here you can start stop both DB and VBCS in single action. It is not enough to stop VBCS, make sure to stop DB too, if you are not using it:

Two payment models are available:
1. Pay As You Go - good when accessing VBCS time to time. Can be terminated at any time
2. Monthly Flex - good when need to run VBCS 24/7. Requires commitment, can't be terminated at any time
When you create Oracle Cloud account, initially you will get 30 days free trial period. At the end of that period (or earlier), you can upgrade to billable plan. To upgrade, go to account management and choose to upgrade promotional offer - you will be given choice to go with Pay As You Go or Monthly Flex:

As soon as you upgrade to Pay As You Go, you will start seeing monthly usage amount in the dashboard. Also it shows hourly usage of VBCS instance, for the one you will be billed:

Click on monthly usage amount, you will see detail view per each service billing. When VBCS instance is stopped (in case of Pay As You Go) - you will be billed only for hardware storage (Compute Classic) - this is relatively very small amount:

There are two options, how you can create VBCS instance - either autonomous VBCS or customer managed VBCS. To be able to stop/start VBCS instance and avoid billing when instance is not used (in case of Pay As You Go) - make sure to go with customer managed VBCS. In this example, VBCS instance was used only for 1 hour and then it was stopped, it can be started again at anytime:

To manage VBCS instance, you would need to navigate to Oracle Cloud Stack UI. From here you can start stop both DB and VBCS in single action. It is not enough to stop VBCS, make sure to stop DB too, if you are not using it:

Wednesday, March 28, 2018
ADF on Docker - Java Memory Limit Tuning for JVM
It might look like a challenge to run Java in Docker environment, by default Java is not aware of Docker memory limits. Check this article for example - Java inside docker: What you must know to not FAIL. I was able to run WebLogic and ADF (Essential WebLogic Tuning to Run on Docker and Avoid OOM) on Docker previously without Java memory issues, using JAVA_OPTIONS=-XX:+UnlockCommercialFeatures -XX:+ResourceManagement -XX:+UseG1GC. However after Docker upgrade to latest version, these settings didn't help anymore. I did't want to hardcode memory setting with -Xmx.
Java started to consume all available memory in Docker and eventually was killed. You can see this from chart below - memory is growing, killed and after restart growing again:

To solve this behaviour, I have applied settings from Java Platform Group, Product Management Blog - Java SE support for Docker CPU and memory limits. I have replaced JAVA_OPTIONS=-XX:+UnlockCommercialFeatures -XX:+ResourceManagement -XX:+UseG1GC set previously with JAVA_OPTIONS=-XX:+UnlockExperimentalVMOptions -XX:+UseCGroupMemoryLimitForHeap -XX:+UseG1GC.
JAVA_OPTIONS=-XX:+UnlockExperimentalVMOptions - XX:+UseCGroupMemoryLimitForHeap -XX:+UseG1GC did the job - JVM stays in Docker memory limits sharp:

This chart shows Java memory behaviour before and after settings were applied. From March 27th - Java memory is a straight line with JAVA_OPTIONS=-XX:+UnlockExperimentalVMOptions - XX:+UseCGroupMemoryLimitForHeap -XX:+UseG1GC:
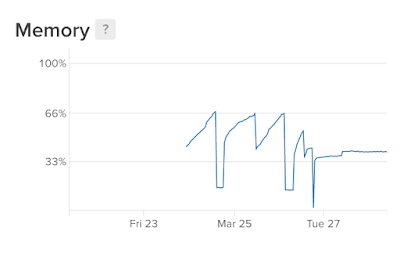
Java started to consume all available memory in Docker and eventually was killed. You can see this from chart below - memory is growing, killed and after restart growing again:

To solve this behaviour, I have applied settings from Java Platform Group, Product Management Blog - Java SE support for Docker CPU and memory limits. I have replaced JAVA_OPTIONS=-XX:+UnlockCommercialFeatures -XX:+ResourceManagement -XX:+UseG1GC set previously with JAVA_OPTIONS=-XX:+UnlockExperimentalVMOptions -XX:+UseCGroupMemoryLimitForHeap -XX:+UseG1GC.
JAVA_OPTIONS=-XX:+UnlockExperimentalVMOptions - XX:+UseCGroupMemoryLimitForHeap -XX:+UseG1GC did the job - JVM stays in Docker memory limits sharp:
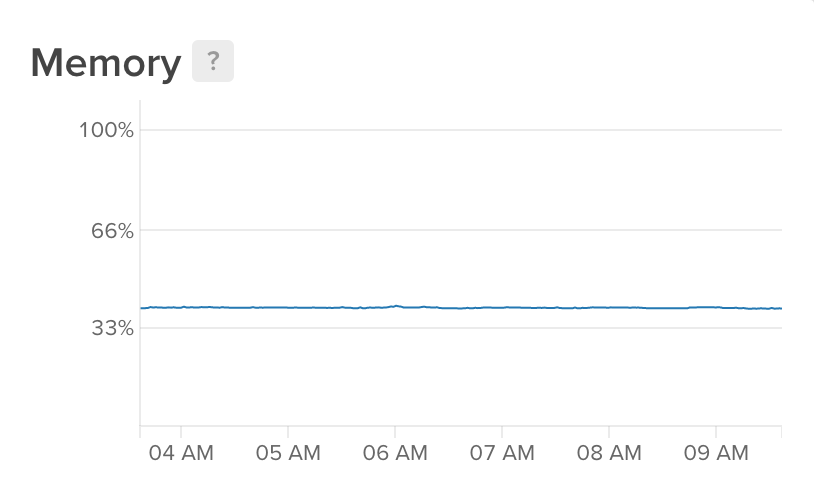
This chart shows Java memory behaviour before and after settings were applied. From March 27th - Java memory is a straight line with JAVA_OPTIONS=-XX:+UnlockExperimentalVMOptions - XX:+UseCGroupMemoryLimitForHeap -XX:+UseG1GC:

Sunday, November 5, 2017
Essential WebLogic Tuning to Run on Docker and Avoid OOM
Read my previous post about how to run ADF on Docker - Oracle ADF on Docker Container. Docker WebLogic image is based on official Oracle Docker image for FMW infrastructure - OracleFMWInfrastructure. WebLogic container created based on this image runs, but not for long - eventually JVM process eats up all memory and OOM (out of memory) exception is thrown. This is known issue related to JVM running in Docker container - Running a JVM in a Container Without Getting Killed. Good news - we can switch on WebLogic memory management functionality to prevent OOM error while running in Docker container. This WebLogic functionality is turned on with special flag -XX:+ResourceManagement. To set this flag, we need to update startWebLogic.sh script, but probably we dont want to rebuild Docker container. Read below how to achieve this.
First we need to access startWebLogic.sh script from Docker container. Make sure Docker container on your host is running and execute Docker copy command:
docker cp RedSamuraiWLS:/u01/oracle/user_projects/domains/InfraDomain/bin/startWebLogic.sh /Users/andrejusbaranovskis/infra/shared
This will copy startWebLogic.sh file from Docker container to your host system.
Search in startWebLogic.sh script content and search for resource management config. By default it is commented out. Set this string for JAVA_OPTIONS. This enables WebLogic resource management and G1GC garbage collector:
JAVA_OPTIONS="-XX:+UnlockCommercialFeatures -XX:+ResourceManagement -XX:+UseG1GC ${SAVE_JAVA_OPTIONS}"
startWebLogic.sh script contains comment, where it recommends to enable this option:

Once JAVA_OPTIONS variable is updated, copy startWebLogic.sh script back to Docker container:
docker cp /Users/andrejusbaranovskis/infra/shared/startWebLogic.sh RedSamuraiWLS:/u01/
Enter into Docker container command prompt (in my case user 501 is root user for Docker container):
docker exec -u 501 -it RedSamuraiWLS bash
Change file permissions for startWebLogic.sh:
chmod 777 startWebLogic.sh
Enter into Docker container as oracle user:
docker exec -it RedSamuraiWLS bash
Copy startWebLogic.sh script from u01 into bin folder (overwrite existing script file):
cp startWebLogic.sh /u01/oracle/user_projects/domains/InfraDomain/bin
Stop Docker container and run docker commit to create new image (which includes change in startWebLogic.sh):
docker commit RedSamuraiWLS abaranovskis/redsamurai-wls:v2
Docker image is created with delta change only, this allows to save space. Run docker images command to verify if new image is created successfully:

Run docker push to upload new image version into Docker repository. Upload will happen fast, because it will upload only delta of changes:
docker push abaranovskis/redsamurai-wls:v2
You should see new image version uploaded into Docker repository:

To run container online, we can login into Digital Ocean console and execute docker run command (I'm using container memory limit -m 4g (4 GB)) - it will pull and run new image:

Once docker container is running, execute top command in Digital Ocean console to monitor memory consumption. Java process memory consumption should not grow, if there is no user activity in WebLogic server:

First we need to access startWebLogic.sh script from Docker container. Make sure Docker container on your host is running and execute Docker copy command:
docker cp RedSamuraiWLS:/u01/oracle/user_projects/domains/InfraDomain/bin/startWebLogic.sh /Users/andrejusbaranovskis/infra/shared
This will copy startWebLogic.sh file from Docker container to your host system.
Search in startWebLogic.sh script content and search for resource management config. By default it is commented out. Set this string for JAVA_OPTIONS. This enables WebLogic resource management and G1GC garbage collector:
JAVA_OPTIONS="-XX:+UnlockCommercialFeatures -XX:+ResourceManagement -XX:+UseG1GC ${SAVE_JAVA_OPTIONS}"
startWebLogic.sh script contains comment, where it recommends to enable this option:

Once JAVA_OPTIONS variable is updated, copy startWebLogic.sh script back to Docker container:
docker cp /Users/andrejusbaranovskis/infra/shared/startWebLogic.sh RedSamuraiWLS:/u01/
Enter into Docker container command prompt (in my case user 501 is root user for Docker container):
docker exec -u 501 -it RedSamuraiWLS bash
Change file permissions for startWebLogic.sh:
chmod 777 startWebLogic.sh
Enter into Docker container as oracle user:
docker exec -it RedSamuraiWLS bash
Copy startWebLogic.sh script from u01 into bin folder (overwrite existing script file):
cp startWebLogic.sh /u01/oracle/user_projects/domains/InfraDomain/bin
Stop Docker container and run docker commit to create new image (which includes change in startWebLogic.sh):
docker commit RedSamuraiWLS abaranovskis/redsamurai-wls:v2
Docker image is created with delta change only, this allows to save space. Run docker images command to verify if new image is created successfully:

Run docker push to upload new image version into Docker repository. Upload will happen fast, because it will upload only delta of changes:
docker push abaranovskis/redsamurai-wls:v2
You should see new image version uploaded into Docker repository:

To run container online, we can login into Digital Ocean console and execute docker run command (I'm using container memory limit -m 4g (4 GB)) - it will pull and run new image:

Once docker container is running, execute top command in Digital Ocean console to monitor memory consumption. Java process memory consumption should not grow, if there is no user activity in WebLogic server:

Subscribe to:
Posts (Atom)