Showing posts with label Hybrid. Show all posts

Thursday, July 6, 2017

Working with Location and Permissions in JET Hybrid

What if you want to access mobile device location data from JET Hybrid application? This can be achieved with Cordova Geolocation plugin. But you want it to be nicely done and want to make sure application is granted with permission to access location information. Use Cordova Permissions plugin for that.

You could add Cordova plugin to JET app by executing this command:

cordova plugin add 

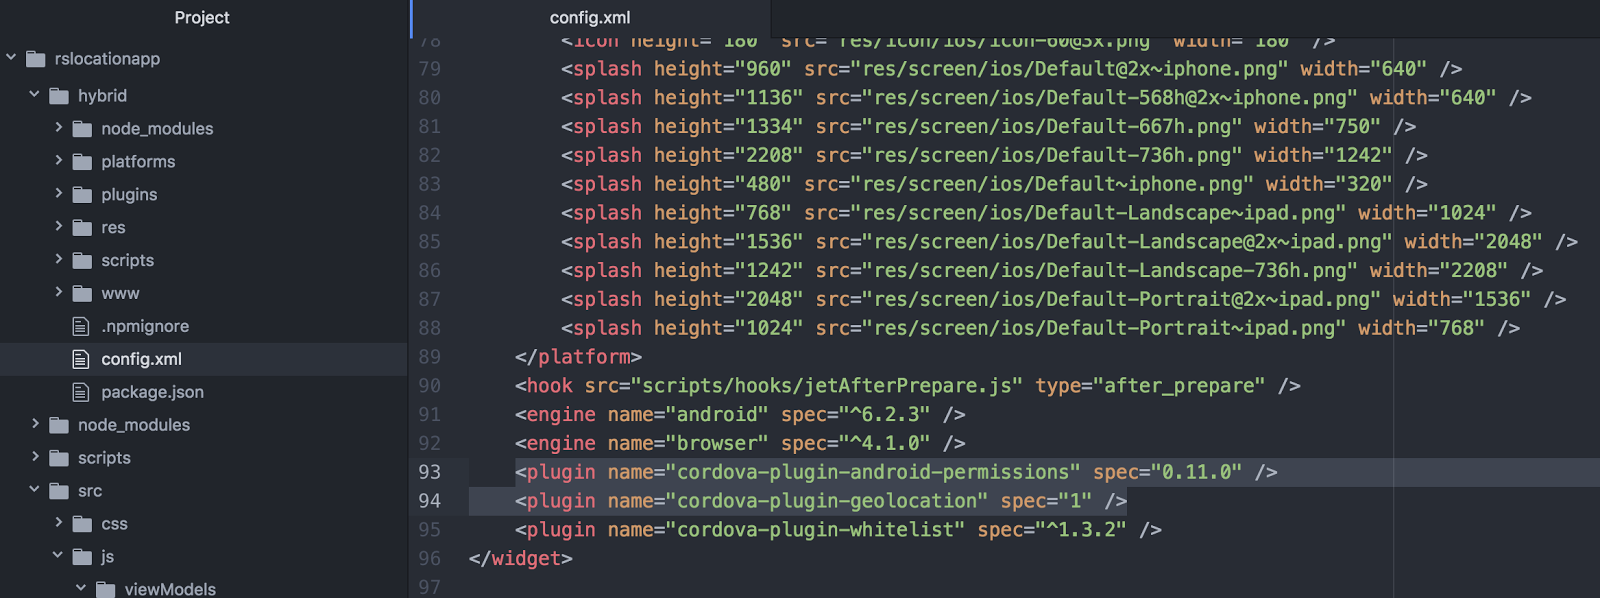
If this command doesnt work for any reason, you could add plugin information directly into config.xml file (check Geertjan post about the same - Plugging into Devices with Oracle JET on Cordova (Part 1)):


In JS function, before calling location API - we call permissions API to check if app is already granted permission to read location data. In hasPermission method, in case of success - location data is accessed. In case of no permission, request for permission is sent. If request is satisfied - location is accessed (and permission is granted at the same time):


Location data is retrieved through callback:


This is how it works. On very first location access, when permission is not granted yet - we request permission through permission API:


When permission is granted, location is displayed:


Download sample application from GitHub repository - rslocationapp.

Thursday, May 18, 2017

Oracle JET Hybrid - NavDrawer Template Menu/Header Structure

Oracle JET provides NavDrawer template for Web and for Hybrid. Read how to create JET Hybrid application based on template - Create a Hybrid Mobile Application. There is significant difference in NavDrawer template implementation when we compare Web and Hybrid application.

Hybrid template draws menu structure on top of the form. Web template is pushing form to the right, when menu is opened. Such approach works fine on the Web, but you would see significant UI lag each time when menu item is selected. Probably thats the reason why hybrid NavDrawer template draws menu on top of the form - visually this provides better performance when switching between menu items. Menu is rendered on the top of the form in JET Hybrid Nav Drawer template:


Form is loaded instantly, when menu item is selected. Header in JET Hybrid NavDrawer template stays fixed, it doesnt scroll. This gives good opportunity to put there common actions:


NavDrawer template in JET Web application moves form to the right, when menu is opened - thats the main visual difference when comparing to NavDrawer Hybrid:


Index page of NavDrawer hybrid template is almost identical to Web NavDrawer, except that it doesn't contain header part. Header is implemented separate module:


I have customized default header implementation with additional items - logo and user preferences:


Header module is constructed in appController, this is how it is generated by default. If we want to have access to variables/functions from appController in the header, we need to create a mapping:


Every module must include div with fixed top JET CSS class (thats why it doesnt scroll and stays on top), where you would copy header code:


Header is bind with module, which is defined by headerConfig variable (must be located in each module) - which is initialized in appController:


Thats all about menu/header implementation.

Let's learn how to push update to Google Play. Make sure to increase application version in Cordova config.xml file:


Go to Google Play and upload new APK, it will be parsed and Google Play automatically will deactivate previous version:


You can initiate roll-out to production:


This will push new release to Google Play. Users will be automatically notified about new version:


Version 2 of our JET Hybrid app is available on Google Play:

Wednesday, May 10, 2017

Oracle JET Hybrid Mobile Application on Google Play

Oracle JET Hybrid mobile application can be published to Google Play and installed on Android device. We have tested this process from beginning to the end. Of course JET Hybrid mobile app can be published on Apple Store too, but we are using Google Plain and Android for now.

Where to get started if you want to publish your own Oracle JET Hybrid (open source and free to use) mobile app? First of all you need to build APK (if building for Android) file in release mode. Read about it in my previous post - How To Package JET Hybrid Mobile Application for Release (Android Platform).

Search for JellyHouse in Google Play to install and test our JET app:


You can use demo data account redsam/welcome1 to login and check how JET runs on your Android mobile:


Let's walk through the main steps about how to upload and publish JET APK file in Google Play. First of all you need to login into Google Play Developer console and pay license fee 25 USD (if you are publishing first time). Second, prepare APK file compiled in release mode (read above how to do it). APK file typically is located in hybrid folder, build/outputs directory:


In Google Play Developer console create new application - press Create Application button:


Before you could publish APK to Google Play, you will be asked to complete various forms with information about the app, content rating and upload application graphics:


APK file is uploaded under Release Management -> Artifact library:


To verify upload, click on show details icon and you should see additional information for uploaded APK:


There are options to manage test releases. But you could opt out directly for production - this is what I did. Press publish button and wait about 30 - 60 minutes. Status should be changed to published:


Once published, search for your app in Google Play. Google Play for JellyHouse app:

Sunday, May 7, 2017

How To Package JET Hybrid Mobile Application for Release (Android Platform)

If you want to build/package JET Hybrid application you must issue build:release or serve:release command. Read more about it in JET developer guide: Packaging Hybrid Mobile Applications. In order to run build:release or serve:release commands successfully, you need create buildConfig.json file, which includes information about self signed certificate. This allows to sign application and package it for release.

Steps below are tested for Android platform.

You can generate certificate with Java keytool utility. Navigate to Java home bin folder and run keytool. Specify correct path and preferred alias:

keytool -genkey -v -keystore /Users/andrejusbaranovskis/jdeveloper/mywork/jellyhouse-release-key.keystore -alias RedSamuraiConsulting -keyalg RSA -keysize 2048 -validity 10000

You will be asked to enter additional information, such as name, organization, location, etc.:


Once certificate is generated, you can create empty buildConfig.json file. I have created it in the root directory of JET Hybrid application. Certificate file is copied into the same location:


Provide release information in buildConfig.json. Since certificate file is located in the same folder, it is enough to specify its name without path. Include alias name, certificate password and keystore password:


If buildConfig.json contains correct entries, build:release should run successfully:

sudo grunt build:release --platform=android --buildConfig=buildConfig.json

Successful result output:


JET Hybrid release app built for Android platform size is 7.5 MB (major part takes Cordova libraries):


So, if you create self signed certificate and populate buildConfig.json correctly - it is very easy to run release build for Oracle JET Hybrid application.

Thursday, April 13, 2017

Production Mobile App with Oracle JET Hybrid in 2 Hours

Do you want to know a secret, how to build mobile application just in 2 hours? Use Oracle JET Hybrid. Beauty of Oracle JET Hybrid - you can reuse the same source code (HTML and JS) from regular JET application. JET UI is responsive out of the box and this allows to render JET screens from the Web on mobile device without changes.

We were using our JET 3.0.0 production app - Red Samurai and Oracle PaaS JCS Success - JET/ADF BC REST Cloud Production Application and created mobile app version. This process took around 2 hours.

Below I will list steps required to create JET Hybrid mobile app out of existing JET app.

1. Execute sudo npm -g install cordova to add Cordova to JET tooling

2. Execute sudo yo oraclejet:hybrid --platforms=android to create new JET Hybrid application. Windows and iOS are supported as well

3. Copy HTML and JS files from src folder of JET app into src folder of JET Hybrid app. Structure of JET Hybrid app with HTML and JS files:


4. Execute sudo grunt build --platform=android to compile JET Hybrid app

5. Execute sudo grunt serve --platform=android --destination=device to deploy JET Hybrid app to mobile device. If you are deploying to Android, you need to have Android tools installed on your machine

Dashboard screen on mobile device, built with JET data visualization components:


Customer setup screen contains JET search list and various input components with validation:


JET dialog looks good in mobile too, with input number fields:


JET input date component on mobile screen:


JET table with pagination is rendered very well and is easily usable on the small screen:


I should say - we are very happy with JET Hybrid functionality. It allows to reuse JET application code and build mobile app very fast.

Sunday, August 28, 2016

Oracle JET Hybrid Receiving Mobile Cloud Service Notification

Oracle JET Hybrid enabled with Cordova Push plugin can receive notifications sent from Oracle Mobile Cloud Service (MCS). You should read how to setup infrastructure in this article - Your first Push notification based Oracle JET Hybrid application!. I will focus on implementation steps and will provide working sample app for download.

Sample JET hybrid application provides login functionality. During login we register device ID with MCS service, this allows to receive notifications:


After login is completed, default dashboard page is displayed. At this point, application is ready to receive notification (even if application will be closed or mobile device screen is locked):


Notification from MCS can be sent programmatically from API implementation. I will show this in the next posts. For now we can use MCS UI to test if notification is working. Mobile Backend provides functionality to send notifications. I can target notification to specific user:


If mobile device registration was successful during login in JET Hybrid, MCS wil send notification and you should see confirmation message (if there will be error, this means registration from Oracle JET Hybrid was unsuccessful):


In few seconds you should see notification received and displayed in notifications screen:


Select notification and it will navigate directly to the app and pass notification message. This would allow to parse it do certain action in the app, for example refresh data, etc.:


To verify if registration with MCS was done correctly during login, you can check logs in Mobile Backend. There must be REST POST /register call logged, just after GET /login:


It would not work to send notification, if there is no Client defined in MCS Backend. You can read more about it from the article mentioned above. Make sure to specify all keys correctly, pointing to Google Cloud Messaging (if you are targeting for Android):


Let's take a look into implementation on JET Hybrid side. Login success callback invokes method to register device to receive push notifications from MCS:


Make sure Cordova Push plugin is installed into your app, otherwise PushNotification will be undefined. It gets registration ID from Google and makes another call to handshake with MCS:


I'm invoking wrapper method, which in turn have access to MCS SDK module in my JET app:


MCS SDK method registerForNotifications is invoked, where REST POST call is made to register device with MCS and allow to receive notifications:


Download sample application (this contains only JET implementation JS/HTML, you should copy it into root src folder of your JET hybrid app) - jet_mcs_notifications.zip.